# Getting Started

## How to Install PrimeLister Extension on Chrome

PrimeLister takes only a few minutes to install on your computer. You'll be able to start engaging more clients, saving time, and increasing revenue once it's installed.

1. Go to the [Chrome Web Store](https://chrome.google.com/webstore/detail/primelister-cross-listing/eepbhjeldlodgnndnjofcnnoampciipg) and install the PrimeLister extension.
2. Click the "Add to Chrome" button.

![](https://lh3.googleusercontent.com/vCFle21L-oW9-L4DnDosylS3p91e--FfFxcT__9MVqltfBdsCNZDhyYp3BYC-fAIwqeckU5J58D3f37DFf1QHLveuzfWmRuQQ3b5JHA9jrihPmOLErwVatBkrvG4e-R8FAsBzYzR)

3\. You will see the following message after a successful installation.

![](https://lh6.googleusercontent.com/DMQbBSWLYb57UR6IM_a__DtN6b5D3Er_dTh5r33SKmuURYuZU7FviezQgYy4WpcTzJB-SWSZZzXazYsWog5T3AqmPpQPOwkrQ3hU4x2GzorWsLHVOap4Rxz_VA5Bve2zYdrEl-Ge)

If you want to see the PrimeLister ​icon in the browser toolbar, as in the above image, it probably is hidden under a puzzle icon. See below for more details:

### **How to pin the PrimeLister extension on the Chrome toolbar**

1. Click on the puzzle icon.

![](https://lh4.googleusercontent.com/TNpTwNJ5beCU_9-EcVeeobuERw2UsSOKKGCDyS8MpSdX4n6VvQkDhtiEqyTFhvaGoZXAqbSG1881pBM0SMrJtm9xa9Tam1G3oOs1GgJCkoVRVP758KxyPv6om0QOnYI1LA0vJ2zy)

2\. Find extension - PrimeLister Click in symbol Pin Extension

3\. Click in symbol Pin Extension

![](https://lh6.googleusercontent.com/77YwZTFb5xl3mAmLK0biAj3Wwe7EnC6PUBVABGbVt8FawXj8vN8x4Zv8qtYP9aY4S7mwmZbRkWZx7eLteFT4QCrmOp2Y306HZt-1dfzf6C4ADPOPaOqnfBCe6ptimzdJ7G0dXemD)

## Number of Tasks Available for Free in Trial Version

PrimeLister comes with a 7-days free trial. The main reason why we offer a free trial is to let our users try PrimeLister out by themselves and see how it works and how it improves their selling performance.

During the trial period, you may cross-list or relist up to 100 listings and complete up to 15,000 actions such as sharing, following, etc.

![](https://lh6.googleusercontent.com/tbx7UnGxBkyWFkI0aGmE8IeBjCAZfN4NYRoXrMtAl0sZIrfHWhBEsNHIoquLAhFQ9nERhL5b1dE3JavYFasn3e_fl6BhZyDIQOVDSqi4aZxif9qjAF_OVEUxnKDWxJTC0Cg5sQjY)

The free trial users cannot do any more listing actions when the limits in the free trial account have been exceeded. If you exceeded the limits and want to keep using PrimeLister you should subscribe to one of our plans.&#x20;

### [How to start my subscription](/account-and-subscription/start-subscription)

PrimeLister is a competitive reselling tool and some people tend to do thousands of tasks after creating a free trial account without paying for the service. That is unfair for our existing users that already pay for the service and our free trial limits are set to protect fair usage amongst our users.

**Notice:** If you think that you did not have a chance to try the tool or to use all of the limits in your trial account for free within 7 days, please get in touch with us using the live chat so we can extend the due date of your trial.

## How to Connect Different Marketplace Accounts to PrimeLister

Make sure the [PrimeLister Extension](https://chrome.google.com/webstore/detail/primelister-cross-listing/eepbhjeldlodgnndnjofcnnoampciipg) is installed on your Chrome Browser and just log into your Poshmark (US, CA, AU), eBay (US, CA, AU), Etsy, Facebook, Depop, Instagram, Facebook Marketplace, or Mercari account in Chrome. PrimeLister Extension will get connected to your accounts automatically. PrimeLister will never ask you for any of your marketplace login information.

Alternatively, you can connect your accounts to the PrimeLister with a click:

1. Click on the PrimeLister icon in Chrome.&#x20;
2. Click on the Start Poshmark US button.&#x20;
3. Click on the Start Poshmark CA button.&#x20;
4. Click on the Start Poshmark AU button.&#x20;
5. Click on the Start Mercari button.&#x20;
6. Click on the Start Facebook button.&#x20;
7. Click on the Start eBay US button.&#x20;
8. Click on the Start eBay CA button.&#x20;
9. Click on the Start eBay AU button.&#x20;
10. Click on the Start Etsy button.&#x20;
11. Click on the Start Depop button.

![](https://2694965679-files.gitbook.io/~/files/v0/b/gitbook-x-prod.appspot.com/o/spaces%2FG6RIJU8HpzCXLZBS9jJ6%2Fuploads%2FxPeCtclfYUat5ztzBUdP%2FScreen%20Shot%20on%202021-10-28%20at%2017-15-18%20\(2\).png?alt=media\&token=76d00797-6386-449a-a1c3-da2fc5c78ddd)

👆The buttons you need to click on to connect your accounts are shown in the screenshot. 👆&#x20;

✅When you complete the steps above, your accounts will be connected.

## How to Update PrimeLister Extension on Chrome

Click the **“CLICK HERE TO UPDATE EXTENSION”** button in PrimeLister. PrimeLister will automatically update itself.

![](https://lh6.googleusercontent.com/f-T0ekkr7MvpGfx3YGP5K3fmFmqBmLToD9F3zDnJnW8boaK6-HXvuUyXaqLdrkpDbGV-W3uZ3ZuWbuUu97wnSncRQg45UxLyAcYRpW_ifZFQzMUvLlkUqBkA0taik5EYQDuhdxN5)

## How to Re-install PrimeLister Extension on Chrome

PrimeLister may release a newer version of the PrimeLister Extension to enable new features and improvements. In case you want to use the latest version of the PrimeLister Extension, you should follow the steps below to re-install the extension.

1. [Visit this page](https://chrome.google.com/webstore/detail/primelister-cross-listing/eepbhjeldlodgnndnjofcnnoampciipg) and click the “Remove from Chrome” button on the page opened to remove the old version of PrimeLister Extension from your Chrome.

![](https://lh4.googleusercontent.com/7HMPspV2l0k_PbtjkFYOryp-DOMj4jhSVabKI7-2Vp6hrzbzfCfcx0-BgR_YtIxwCcD-qjZv5-xaBmkxgjDCLTr4KP8bBrJ49bFmyShKHk_8tPG_RS15PrHlMydAe3HH2UCqbP-g)

2\.  [Visit this page](https://chrome.google.com/webstore/detail/primelister-cross-listing/eepbhjeldlodgnndnjofcnnoampciipg) and click the “Add to Chrome” button on the page opened to install the latest version of PrimeLister Extension on your Chrome.

![](https://lh4.googleusercontent.com/zmd9EWYMQTe2SQ1XT9chqDlJmkTsMczQbGHsI9QGMQ_K8-1N8r6IeUD0C62H_APq7RJB3OEGGLqxyyh1LLIJkJDn7A3_K1JxIUqimdF5UGWIzqgSd36YweRZC91IrNUTXrodH4Ub)

## How to Uninstall PrimeLister Extension from Chrome

[Visit this page](https://chrome.google.com/webstore/detail/primelister-poshmark-merc/eepbhjeldlodgnndnjofcnnoampciipg) and click on the “Remove from Chrome” button on the page opened to remove the PrimeLister Extension from Chrome.

![](https://lh6.googleusercontent.com/4ZjueGi-15Hz2gLLvHcZuUHQKYrmiCgK5Lq1cdpTlfTpZdM1uAYV9naIWd8tAJlEkOZOt2U8H9KdJxMEp8bPvBKOGkEIY98aVuYr4NSioH-4zyPLRQW00QEXZHXweM-UjsgwetQg)

Or you can remove the PrimeLister Extension from Chrome manually:

1. Alternatively, click Window > Extensions or click the three dots (top right) > More Tools > Extensions
2. Uninstall the extension by clicking on the remove button.

![](https://lh5.googleusercontent.com/ClWbzDuibTtdWVLv-KlLmqW8jqqVFtTHqA3vQW28XvzAowHeKTRCwzGMJU3dSx83I4s-LSnN5kiFYEpXQQnQ82xGaHdcTcMrKAjHv3Mvmxxi6iJLMAFptemKZF6uIuKTZ4yZvGwD)


# How to Install PrimeLister Extension on Chrome

PrimeLister takes only a few minutes to install on your computer. You'll be able to start engaging more clients, saving time, and increasing revenue once it's installed.

1. Go to the [Chrome Web Store](https://chrome.google.com/webstore/detail/primelister-cross-listing/eepbhjeldlodgnndnjofcnnoampciipg) and install the PrimeLister extension.
2. Click the "Add to Chrome" button.

![](https://lh3.googleusercontent.com/vCFle21L-oW9-L4DnDosylS3p91e--FfFxcT__9MVqltfBdsCNZDhyYp3BYC-fAIwqeckU5J58D3f37DFf1QHLveuzfWmRuQQ3b5JHA9jrihPmOLErwVatBkrvG4e-R8FAsBzYzR)

3\. You will see the following message after a successful installation.

![](https://lh6.googleusercontent.com/DMQbBSWLYb57UR6IM_a__DtN6b5D3Er_dTh5r33SKmuURYuZU7FviezQgYy4WpcTzJB-SWSZZzXazYsWog5T3AqmPpQPOwkrQ3hU4x2GzorWsLHVOap4Rxz_VA5Bve2zYdrEl-Ge)

If you want to see the PrimeLister ​icon in the browser toolbar, as in the above image, it probably is hidden under a puzzle icon. See below for more details:

### [**How to pin the PrimeLister extension on the Chrome toolbar**](#how-to-pin-the-primelister-extension-on-the-chrome-toolbar)

1. Click on the puzzle icon.

![](https://lh4.googleusercontent.com/TNpTwNJ5beCU_9-EcVeeobuERw2UsSOKKGCDyS8MpSdX4n6VvQkDhtiEqyTFhvaGoZXAqbSG1881pBM0SMrJtm9xa9Tam1G3oOs1GgJCkoVRVP758KxyPv6om0QOnYI1LA0vJ2zy)

2\. Find extension - PrimeLister Click in symbol Pin Extension

3\. Click in symbol Pin Extension

![](https://lh6.googleusercontent.com/77YwZTFb5xl3mAmLK0biAj3Wwe7EnC6PUBVABGbVt8FawXj8vN8x4Zv8qtYP9aY4S7mwmZbRkWZx7eLteFT4QCrmOp2Y306HZt-1dfzf6C4ADPOPaOqnfBCe6ptimzdJ7G0dXemD)


# Number of Tasks Available for Free in Trial Version

Welcome to PrimeLister! Our 7-day-free trial offers a unique opportunity to explore our Crosslister and Poshmark Cloud-Based automation tools without any financial commitment. With a single sign-up, you can access both tools, streamlining your selling process across multiple platforms.

During the trial period, you can:

### Cross-lister Tool Trial

* **Tasks Quota**: 100 tasks
* **Counted Actions**:  Cross-list, Re-list, Delist,
* **Not Counted Actions**: Import, Delete

### Poshmark Automation Tool Trial

* **Closet Capacity**: 1 closet
* **Tasks**: Unlimited

<figure><img src="https://2694965679-files.gitbook.io/~/files/v0/b/gitbook-x-prod.appspot.com/o/spaces%2FG6RIJU8HpzCXLZBS9jJ6%2Fuploads%2FOUx61SoKWRh81jC6zTqN%2FAnnotation%20on%202024-03-07%20at%2011-41-37.png?alt=media&amp;token=c0969d17-495b-49f6-93ff-402d621afdba" alt=""><figcaption></figcaption></figure>

PrimeLister's free trial aims to ensure fair use for all users, setting limits to prevent abuse. For those who didn't fully utilize their trial, contact us for a possible extension.&#x20;

**Notice:** The Crosslister Tool and Poshmark Automation Tool serve unique purposes and thus have individual pricing. Subscriptions must be initiated separately for each tool to cater to specific needs.

***

**Have you reached the trial quota?**

Once you reach your trial quota, you'll need to choose one of our subscription plans to continue enjoying PrimeLister's full capabilities.

Embrace the opportunity to enhance your reselling business with PrimeLister. For more details on our trial and subscription plans, visit our documentation page.

### [**How to start my subscription**](/account-and-subscription/start-subscription)


# How to Connect Different Marketplace Accounts to PrimeLister

Make sure the [PrimeLister Extension](https://chrome.google.com/webstore/detail/primelister-cross-listing/eepbhjeldlodgnndnjofcnnoampciipg) is installed on your Chrome Browser and just log into your Poshmark (US, CA, AU), eBay (US, CA, AU), Etsy, Facebook, Depop, Instagram, Facebook Marketplace, or Mercari account in Chrome. PrimeLister Extension will get connected to your accounts automatically. PrimeLister will never ask you for any of your marketplace login information.

Alternatively, you can connect your accounts to the PrimeLister with a click:

1- Click on the PrimeLister icon in Chrome.&#x20;

2- Click on the Start Poshmark US button.&#x20;

3- Click on the Start Poshmark CA button.&#x20;

4- Click on the Start Poshmark AU button.&#x20;

5- Click on the Start Mercari button.&#x20;

6- Click on the Start Facebook button.&#x20;

7- Click on the Start eBay US button.&#x20;

8- Click on the Start eBay CA button.&#x20;

9- Click on the Start eBay AU button.&#x20;

10- Click on the Start Etsy button.&#x20;

11- Click on the Start Depop button.

![](https://2694965679-files.gitbook.io/~/files/v0/b/gitbook-x-prod.appspot.com/o/spaces%2FG6RIJU8HpzCXLZBS9jJ6%2Fuploads%2FxPeCtclfYUat5ztzBUdP%2FScreen%20Shot%20on%202021-10-28%20at%2017-15-18%20\(2\).png?alt=media\&token=76d00797-6386-449a-a1c3-da2fc5c78ddd)

👆The buttons you need to click on to connect your accounts are shown in the screenshot. 👆&#x20;

✅When you complete the steps above, your accounts will be connected.


# How to Re-install PrimeLister Extension on Chrome

PrimeLister may release a newer version of the PrimeLister Extension to enable new features and improvements. In case you want to use the latest version of the PrimeLister Extension, you should follow the steps below to re-install the extension.

1. [Visit this page](https://chrome.google.com/webstore/detail/primelister-cross-listing/eepbhjeldlodgnndnjofcnnoampciipg) and click the “Remove from Chrome” button on the page opened to remove the old version of PrimeLister Extension from your Chrome.

![](https://lh4.googleusercontent.com/7HMPspV2l0k_PbtjkFYOryp-DOMj4jhSVabKI7-2Vp6hrzbzfCfcx0-BgR_YtIxwCcD-qjZv5-xaBmkxgjDCLTr4KP8bBrJ49bFmyShKHk_8tPG_RS15PrHlMydAe3HH2UCqbP-g)

2\.  [Visit this page](https://chrome.google.com/webstore/detail/primelister-cross-listing/eepbhjeldlodgnndnjofcnnoampciipg) and click the “Add to Chrome” button on the page opened to install the latest version of PrimeLister Extension on your Chrome.

![](https://lh4.googleusercontent.com/zmd9EWYMQTe2SQ1XT9chqDlJmkTsMczQbGHsI9QGMQ_K8-1N8r6IeUD0C62H_APq7RJB3OEGGLqxyyh1LLIJkJDn7A3_K1JxIUqimdF5UGWIzqgSd36YweRZC91IrNUTXrodH4Ub)


# How to Uninstall PrimeLister Extension from Chrome

[Visit this page](https://chrome.google.com/webstore/detail/primelister-poshmark-merc/eepbhjeldlodgnndnjofcnnoampciipg) and click on the “Remove from Chrome” button on the page opened to remove the PrimeLister Extension from Chrome.

![](https://lh6.googleusercontent.com/4ZjueGi-15Hz2gLLvHcZuUHQKYrmiCgK5Lq1cdpTlfTpZdM1uAYV9naIWd8tAJlEkOZOt2U8H9KdJxMEp8bPvBKOGkEIY98aVuYr4NSioH-4zyPLRQW00QEXZHXweM-UjsgwetQg)

Or you can remove the PrimeLister Extension from Chrome manually:

1. Alternatively, click Window > Extensions or click the three dots (top right) > More Tools > Extensions
2. Uninstall the extension by clicking on the remove button.

![](https://lh5.googleusercontent.com/ClWbzDuibTtdWVLv-KlLmqW8jqqVFtTHqA3vQW28XvzAowHeKTRCwzGMJU3dSx83I4s-LSnN5kiFYEpXQQnQ82xGaHdcTcMrKAjHv3Mvmxxi6iJLMAFptemKZF6uIuKTZ4yZvGwD)


# Use Same Account on Different Devices

You don't need to create a separate account on the second computer for the same closet. You can use the same PrimeLister account credentials on many computers, including those at home and at work.

**Follow the steps below:**

1. Go to the [**Chrome Web Store**](https://chrome.google.com/webstore/detail/primelister-cross-listing/eepbhjeldlodgnndnjofcnnoampciipg) and [**install the PrimeLister extension**](/getting-started/install-primelister-chrome-extension)**.**
2. Click on the **PrimeLister Icon** which is on the top right side of the screen.&#x20;
3. <img src="https://2694965679-files.gitbook.io/~/files/v0/b/gitbook-x-prod.appspot.com/o/spaces%2FG6RIJU8HpzCXLZBS9jJ6%2Fuploads%2FwveTRyshOMFt6j8RcDsq%2FAnnotation%20on%202021-12-02%20at%2012-59-50.png?alt=media&amp;token=19315558-6481-4129-b36e-e0020a1f63c4" alt="" data-size="original">
4. Click on the **Login to PrimeLister Account** button.
5. You will be redirected to a page.
6. ![](https://2694965679-files.gitbook.io/~/files/v0/b/gitbook-x-prod.appspot.com/o/spaces%2FG6RIJU8HpzCXLZBS9jJ6%2Fuploads%2FJi05fOi7vmVz0tFUvHBW%2FScreen%20Shot%20on%202021-12-02%20at%2013-03-19.png?alt=media\&token=3bd1e00a-ffca-434d-ac55-1224e33b8fb3)
7. Log in with your PrimeLister Credentials.
8. Click on the **Log In** button.


# Account & Subscription

Learn more about account and subscription management on PrimeLister. 🤓

## Account & Subscription - Articles 📚

{% content-ref url="/pages/szSiFcHEfsGVsU3y7vwe" %}
[How to Verify Email Address to Activate PrimeLister Account](/account-and-subscription/email-verification)
{% endcontent-ref %}

{% content-ref url="/pages/tR8yo5gpvPGfByCe3tnD" %}
[How to Start Subscription](/account-and-subscription/start-subscription)
{% endcontent-ref %}

{% content-ref url="/pages/AG0nHg7VyXT20O2mNsek" %}
[How to Resolve Issues When Credit Card Fails](/account-and-subscription/how-to-resolve-issues-when-credit-card-fails)
{% endcontent-ref %}

{% content-ref url="/pages/1sZVJkwZlecPQk5ECG02" %}
[PrimeLister Refund Policy](/account-and-subscription/refund-policy)
{% endcontent-ref %}

{% content-ref url="/pages/OrbkG9lJS9s4uU5d02Et" %}
[How to Cancel Subscription](/account-and-subscription/cancel-subscription)
{% endcontent-ref %}

{% content-ref url="/pages/bWZvqvQHsLJiZOG6GWqQ" %}
[How to Apply Discount Coupons](/account-and-subscription/how-to-apply-discount-coupons)
{% endcontent-ref %}

{% content-ref url="/pages/1W4tbhCp2MqAGHYcy4Nz" %}
[Broken mention](broken://pages/1W4tbhCp2MqAGHYcy4Nz)
{% endcontent-ref %}


# How to Verify Email Address to Activate PrimeLister Account

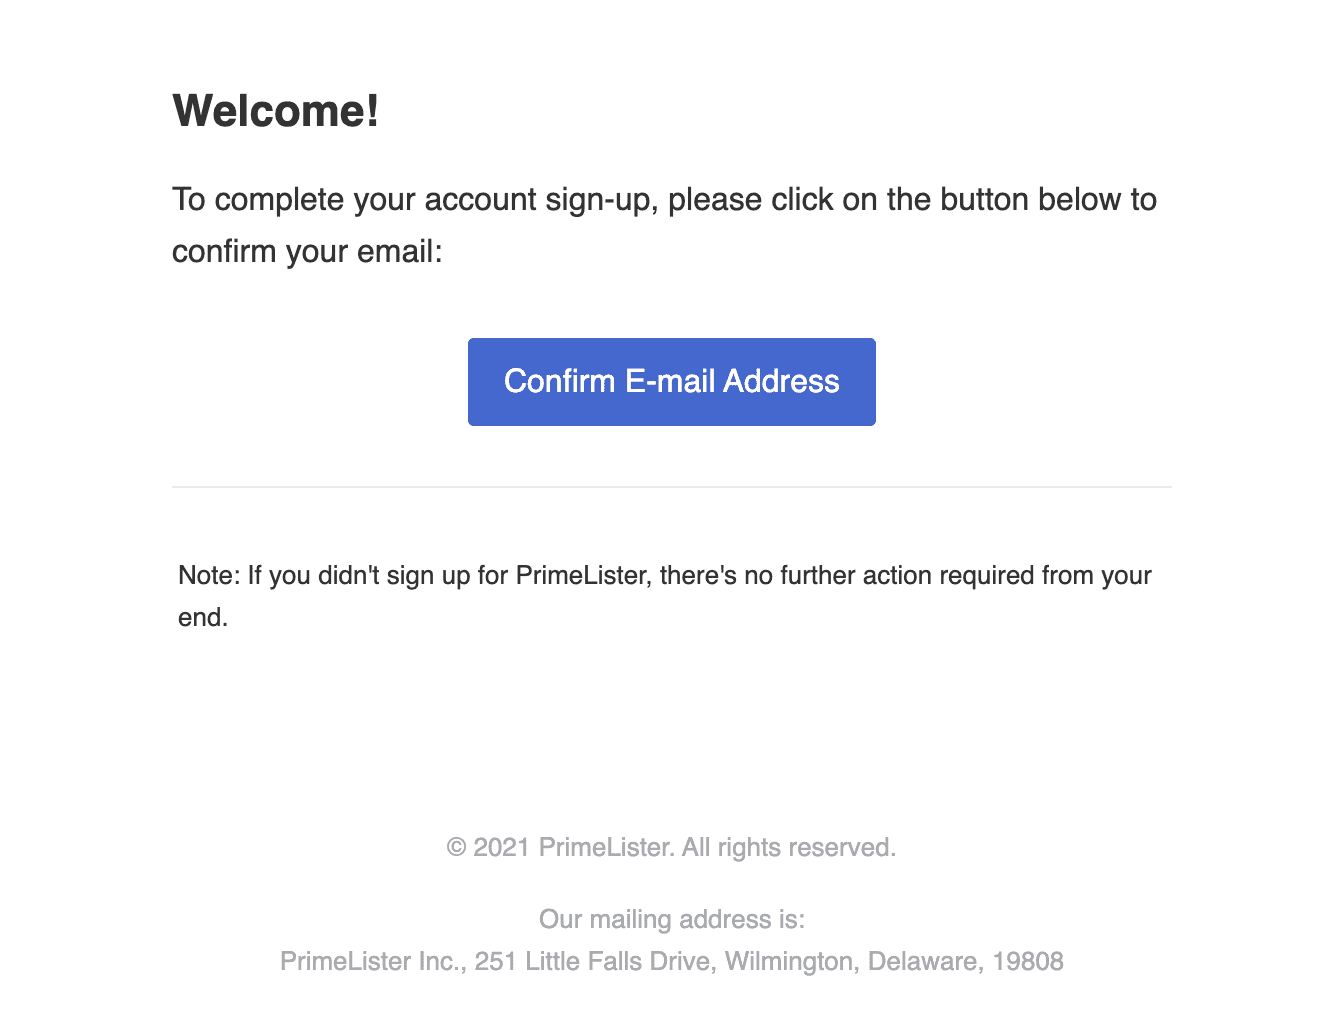
You need to verify the email address that you used in signing up on PrimeLister for security reasons.&#x20;

**How to verify your email address?**&#x20;

1. Make sure you signed up to PrimeLister with your email address and password.&#x20;
2. Open your inbox of the email address that you used in the registration process. (Check your spam/junk box if you could not find the email in your inbox)&#x20;
3. Open the email from PrimeLister, that has the subject: Complete your registration&#x20;
4. Click on the link in this mail.

![](https://lh5.googleusercontent.com/1RqH1z40VT-odnaCP8-ImXtFRQKp91rvop3yCSQyWpALkjarArIZi5tcl1HXxyZJnxMBddAtf6AO5jyUVNz9xSgU2KAjZc8HDNmWf62lBgYL0fMNldxTzSOkG4Q_r3j-7GLAvYtG)

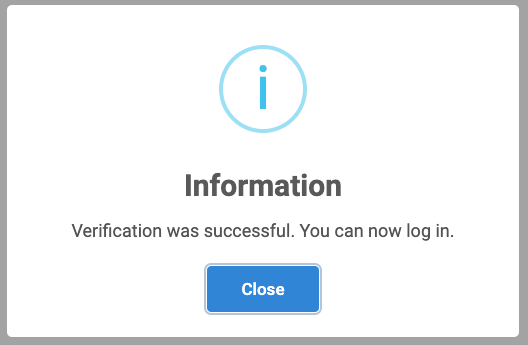
You will be directed to the PrimeLister website and see a notification as shown below.
![](https://lh5.googleusercontent.com/ocvqn-l2a_nxxlGISKVUzUMKA09n57nzruyZiNwrdPaFuf4s8GdJrp4DG_ecNyIFu6IbeqUApOx0skcG3E6iguLKANxAWS51ErtsykAiQIlLa1BFtdQH9hCW5W2ACyCfp9C33Pwp)

Your email address is verified and your PrimeLister account is activated now.


# How to Start Subscription

**Start your subscription in 3 easy steps:**

![](https://lh6.googleusercontent.com/Lzx4Z1n_EtlHj2LB9C3deyAhtr9xuEbfGa3JRDLJXOMuEzCgtN3PkycSShpO4GPHLnh02D4nBMDJovTK5VVk6HfnQeWkhjs1yWTslIueLclogcSsFypZ8FNPN1M3lruB5xMyF7nm)

1. Navigate to this page: <https://app.primelister.com/panel/billing> (Login with your PrimeLister account credentials. You will see the page above.)&#x20;
2. Select your plan on the "Plans/Billing" page.&#x20;
3. Click the "Subscribe Now" button, and in the billing pop-up, enter your payment card details. Stripe handles payments in a safe manner. We don't keep track of your payment card details; Stripe handles that.

**Note: If you save the yearly plan, you will save 30%.**&#x20;


# How to Resolve Issues When Credit Card Fails

**You can use PrimeLister's free trial without credit card information.**&#x20;

You may not have allowed your credit card for online payments or abroad payments.&#x20;

Stripe, the payment processor we use on PrimeLister, is a widely used and reliable payment service globally. It requires you to activate your credit card for online payments and abroad payments in order to complete your payment transaction through Stripe securely. You should enable these settings of your credit card before you proceed to the payment.&#x20;

**There is not enough limit on your credit card.**&#x20;

If you are using virtual cards on your payment, we recommend you define a limit above the amount of the transaction that you want to make.

**Your card was declined.**

If you get this message you need to activate your credit card for online payments and abroad payments in order to complete your payment transaction through Stripe securely. Note: Although it is dependent on location, in general Stripe accepts major cards including:&#x20;

-VISA&#x20;

-VISA Debit

-MasterCard&#x20;

-Discover&#x20;

-JCB&#x20;

-American Express


# PrimeLister Refund Policy

At PrimeLister, we are committed to ensuring that our customers receive the highest quality service. We strive to balance a fair refund process for genuine issues with measures that protect our business from potential abuse. The following policy outlines the procedures and conditions for refund requests, from general principles to specific guidelines. By subscribing to PrimeLister, you agree to the terms outlined in this Refund Policy.

***

1. **Requesting a Refund:**

If you meet our refund eligibility criteria outlined below, send us an email to <support@primelister.com> with the subject "Refund". Include your PrimeLister account email and a detailed description of the issue.

***

2. **Refund Eligibility Criteria:**

Refunds will be granted only under the following conditions:

* **Unconditional Refund Eligibility Window:**
  * **First-Time Subscriptions:** For first-time subscriptions, whether monthly or annual, a full refund is available if requested within the first 48 hours of payment.
  * **Repeating Subscriptions:**
    * **Monthly Subscriptions:** A full refund is available if requested within the first 48 hours of payment.
    * **Annual Subscriptions:** A full refund is available if requested within 7 days of the renewal payment.
* **Refunds for Platform Issues:** If PrimeLister fails to function due to documented technical difficulties or platform issues, you may be eligible for a refund. You must provide supporting evidence (e.g., screenshots, and error logs) when submitting your refund request. The refund amount will be prorated to account for the service already consumed.
* **Prorated Refunds:** Refunds will only cover the unexpired portion of your subscription from the refund request date onward. In cases of technical issues or high usage, the refund amount will be prorated to account for the service already consumed.
* **Refund Limited to Last Billing Cycle:** If a refund is requested for multiple billing cycles, only the most recent billing cycle will be considered for a refund, subject to the applicable refund criteria below.
* **Exclusions:**
  * **Refunds for Personal Reasons:** Refunds will not be provided for cancellations based on personal reasons (e.g., choosing to stop reselling).
  * **No Refunds for Used Service Periods:** Refund requests for days or months already used before the refund request or occurring after the refund request during the evaluation period will not be eligible.
  * **Feature Usage Refund Restriction:** An unconditional refund will not be granted in cases where service features have been actively used.
  * **International Transaction Fees:** PrimeLister does not charge international transaction fees. These fees are applied by your bank or payment provider when processing cross-border payments. We are not responsible for these fees and will not provide refunds or adjustments.

***

3. **Refund Process**
   1. **Submission:** Send us an email to <support@primelister.com> with the subject "Refund," including your PrimeLister account email and the reason for your refund request.
   2. **Evaluation:** Our support team will review your refund request, and verify the eligibility.
   3. **Processing:** Approved refunds will be credited back to your original payment method within **5–10 business days.**

***

4. **Free Trials**

Refunds are not relevant to the free trial because no payment details are required, and no charges apply. The trial ends automatically unless you choose to subscribe to a paid plan.

***

5. **Dispute Clause**

Payment disputes via financial institutions for non-fraudulent reasons are not accepted and may result in suspension or legal action. Any refund request will be put on hold if a dispute is filed for the same payment by the customer through their financial institution.

***

6. **Amendments and Updates**

PrimeLister reserves the right to modify or update this Refund at any time. Any changes will be posted on our website and become effective immediately upon posting.


# How to Cancel Subscription

Cancel your subscription in 2 easy steps:&#x20;

1. Navigate to your PrimeLister [Plans/Billing Panel.](https://app.primelister.com/panel/billing)&#x20;
2. Click on the "Cancel Subscription" button.

![](https://lh4.googleusercontent.com/DrooERG-kYXCY6GDZyzHGhfZyoY0OLKeLj8xh5L44zw1RQH9POnKC-uRF6WTsUDzvGyww4nt_bcpq53GBLClF-I4Lvo1f5Kf_DNVx90DYOoPOxcCvorwEq13ke9O-qusA7pjcINB)

**What happens if I cancel my subscription?**&#x20;

If you cancel your subscription, the features your subscription unlocked will be unavailable to you after the time you’ve already paid for has expired.


# How to Apply Discount Coupons

If you have a discount coupon code, you can use it when you subscribe to only a monthly plan on PrimeLister. Since the annual plans already include a 30% discount, we do not allow extra discount codes to be used in these plans.&#x20;

To apply a discount coupon code, open [PrimeLister Plans/Billing](https://app.primelister.com/panel/billing) page, and select subscription after that you will be redirected to the checkout page. Click the "Apply" button in the subscription field as shown below:

![
](https://lh5.googleusercontent.com/zQ_wpJKp9zRizpDYPWvoCjGGjZJZBbmKZ_1m4a2ysIqUJI1demAmaZLOXAJYtWuLQvfDZOWH-uF9YB00BTXX0YI7ir1cxEUF0zBn54MSUBnclmUJZkp3o-wHgiRntFvh8sT5WlrW)

#### **Can I use the coupon code for the yearly plan?**

* No, the annual plans already include a 30% discount, we do not allow extra discount codes to be used in these plans.


# Understanding Your Poshmark Automation Subscription: Cloud Transition and New Enforcement

Our terms have always stated that each subscription is valid for one closet only. Due to limitations in our Chrome extension, users were previously able to manage multiple closets under a single subscription.&#x20;

As we migrate to our more robust, secure, and efficient Cloud Automation platform, we are simply enforcing the original one-closet-per-subscription policy that has been in place since our inception. We are not introducing a new pricing strategy; we are merely applying the existing one in a cloud-based environment.

We understand that this transition might raise questions, so we've put together this FAQ to address your concerns and provide clear guidelines going forward.

**Q: What has changed in the Poshmark Automation Subscription?**

**A:** Previously, users could manage multiple closets with a single subscription via our Chrome extension. Going forward, and in line with our original policy, each closet will require its own separate subscription, especially with the introduction of our Cloud Automation.

\
**Q: How do I transition my existing subscription?**

**A:** If you have been managing multiple closets with a single subscription, you'll need to sign up for separate subscriptions for each closet.

**Q: What if I have more than 10 closets?**

**A:** Our current pricing structure is designed for up to 10 closets. If you manage more than 10, please contact our support team for customized solutions.

**Q: What happens to Lifetime Subscriptions under the new policy?**

**A:** Lifetime subscriptions are valid for a single closet only. If you wish to add more closets, you'll need to upgrade your subscription.

Under the new policy, all existing lifetime subscriptions will be converted to a single valid monthly plan for one closet. If you choose to upgrade to manage more closets, additional charges will apply based on the new pricing model.

However, if you later decide to revert back to a single closet after upgrading, no further payments will be required as long as you maintain just that one closet under the lifetime subscription.

\
**Q: How does the new pricing work for multiple closets?**

**A:** We've updated our pricing model to offer discounts for those who manage multiple closets. For a complete overview of pricing for all closets, you can directly review the rates [by clicking ](https://app.primelister.com/subscription/poshmark-automation)

**Monthly Pricing for Up to 10 Closets:**

| # of Closets | Price Per Unit |
| ------------ | -------------- |
| 1            | $25.00         |
| 2-3          | $20.00         |
| 4-10         | $18.00         |

**Annual Pricing for Up to 10 Closets:**

| # of Closets | Price Per Unit |
| ------------ | -------------- |
| 1            | $240.00        |
| 2-3          | $192.00        |
| 4-10         | $173.00        |

***

For any special circumstances or further questions, feel free to reach out to our support team by emailing <support@primelister.com>.


# Features

Learn more about the features of PrimeLister. 🤓

## PrimeLister Features by Product 📚

{% content-ref url="/pages/eI6V4T1HR0ITHk4ZuvG0" %}
[Cross-lister Tool](/features/cross-lister-tool)
{% endcontent-ref %}

{% content-ref url="/pages/kjShEadngVI2FATTX4bP" %}
[Broken mention](broken://pages/kjShEadngVI2FATTX4bP)
{% endcontent-ref %}

{% content-ref url="/pages/s6BnYbjMc47guUvmNXpq" %}
[Relister Tool](/features/cross-lister-tool/relister-tool)
{% endcontent-ref %}


# Cross-lister Tool

Learn more about the features of the Cross-lister Tool. 🤓

## Cross-lister Tool - Features 📚

{% content-ref url="/pages/h9g1m1Z9n07Su3DuIdaM" %}
[Relist](/features/cross-lister-tool/relist)
{% endcontent-ref %}

{% content-ref url="/pages/gLevx82lPx0RtSNMlwEr" %}
[Import](/features/cross-lister-tool/import)
{% endcontent-ref %}

{% content-ref url="/pages/8SN4XfXvPNjhFTX9KC2s" %}
[Cross-list](/features/cross-lister-tool/cross-list)
{% endcontent-ref %}

{% content-ref url="/pages/acl2zGemeabBhfAFZCYh" %}
[Duplicate](/features/cross-lister-tool/duplicate)
{% endcontent-ref %}

{% content-ref url="/pages/lfMtuqAxXbSytv1hcgKS" %}
[Delete](/features/cross-lister-tool/delete)
{% endcontent-ref %}

{% content-ref url="/pages/lyLFH2lKpxdPOZAasXu8" %}
[Delist](/features/cross-lister-tool/delist)
{% endcontent-ref %}

{% content-ref url="/pages/bDFbyuInfX7uMU3SJ7Vw" %}
[Offer](/features/cross-lister-tool/offer)
{% endcontent-ref %}


# 🔄 Sync Listings

Sync Listings automatically imports all your active listings from connected marketplaces into a single Inventory Manager.

### What is Sync Listings?

**Sync Listings** is a PrimeLister feature that automatically imports all your active listings from your connected marketplaces into a single, unified **Inventory Manager**. Instead of managing your items separately on each platform, everything lives in one place — organized, up-to-date, and easy to navigate.

PrimeLister uses AI to build your inventory automatically, so there's no manual data entry involved.

***

### Why Use It?

If you sell on multiple platforms, keeping track of what's listed where can get messy fast. Sync Listings solves that by giving you one central view of your entire inventory across all your stores.

* 📦 **Everything in one place** — See all your listings from all connected platforms in a single inventory view.
* 🤖 **AI-powered import** — PrimeLister automatically pulls in your listings and organizes them. No copy-pasting, no manual work.
* 🔁 **Always up to date** — Sync whenever you want to make sure your inventory reflects your latest listings.
* 📊 **Better insights** — With your full inventory synced, you get a clearer picture of your stock across platforms.

***

### Supported Platforms

<table><thead><tr><th width="231.43048095703125">Platform</th><th>Status</th><th>Sync Limit</th></tr></thead><tbody><tr><td><strong>Poshmark</strong></td><td>✅ Available now</td><td>5,000 listings</td></tr><tr><td><strong>Mercari</strong></td><td>✅ Available now</td><td>No limit</td></tr><tr><td><strong>Depop</strong></td><td>✅ Available now</td><td>No limit</td></tr><tr><td><strong>Grailed</strong></td><td>✅ Available now</td><td>No limit</td></tr><tr><td><strong>Etsy</strong></td><td>✅ Available now</td><td>No limit</td></tr><tr><td><strong>Shopify</strong></td><td>✅ Available now</td><td>No limit</td></tr><tr><td><strong>eBay</strong></td><td>✅ Available now</td><td>No limit</td></tr></tbody></table>

> ⚠️ **Why is Poshmark limited to 5,000?** Poshmark's closet page only displays up to 5,000 items, so PrimeLister can only access and import the items that Poshmark itself makes visible. This is a Poshmark-side limitation, not a PrimeLister one.

***

### How to Use Sync Listings

#### Before You Start

Make sure you have:

* ✅ **PrimeLister Chrome Extension** installed — [Download here](https://chromewebstore.google.com/detail/cross-listing-poshmark-to/eepbhjeldlodgnndnjofcnnoampciipg)
* ✅ At least one **store connected** to PrimeLister

***

#### Step 1 — Connect Your Store

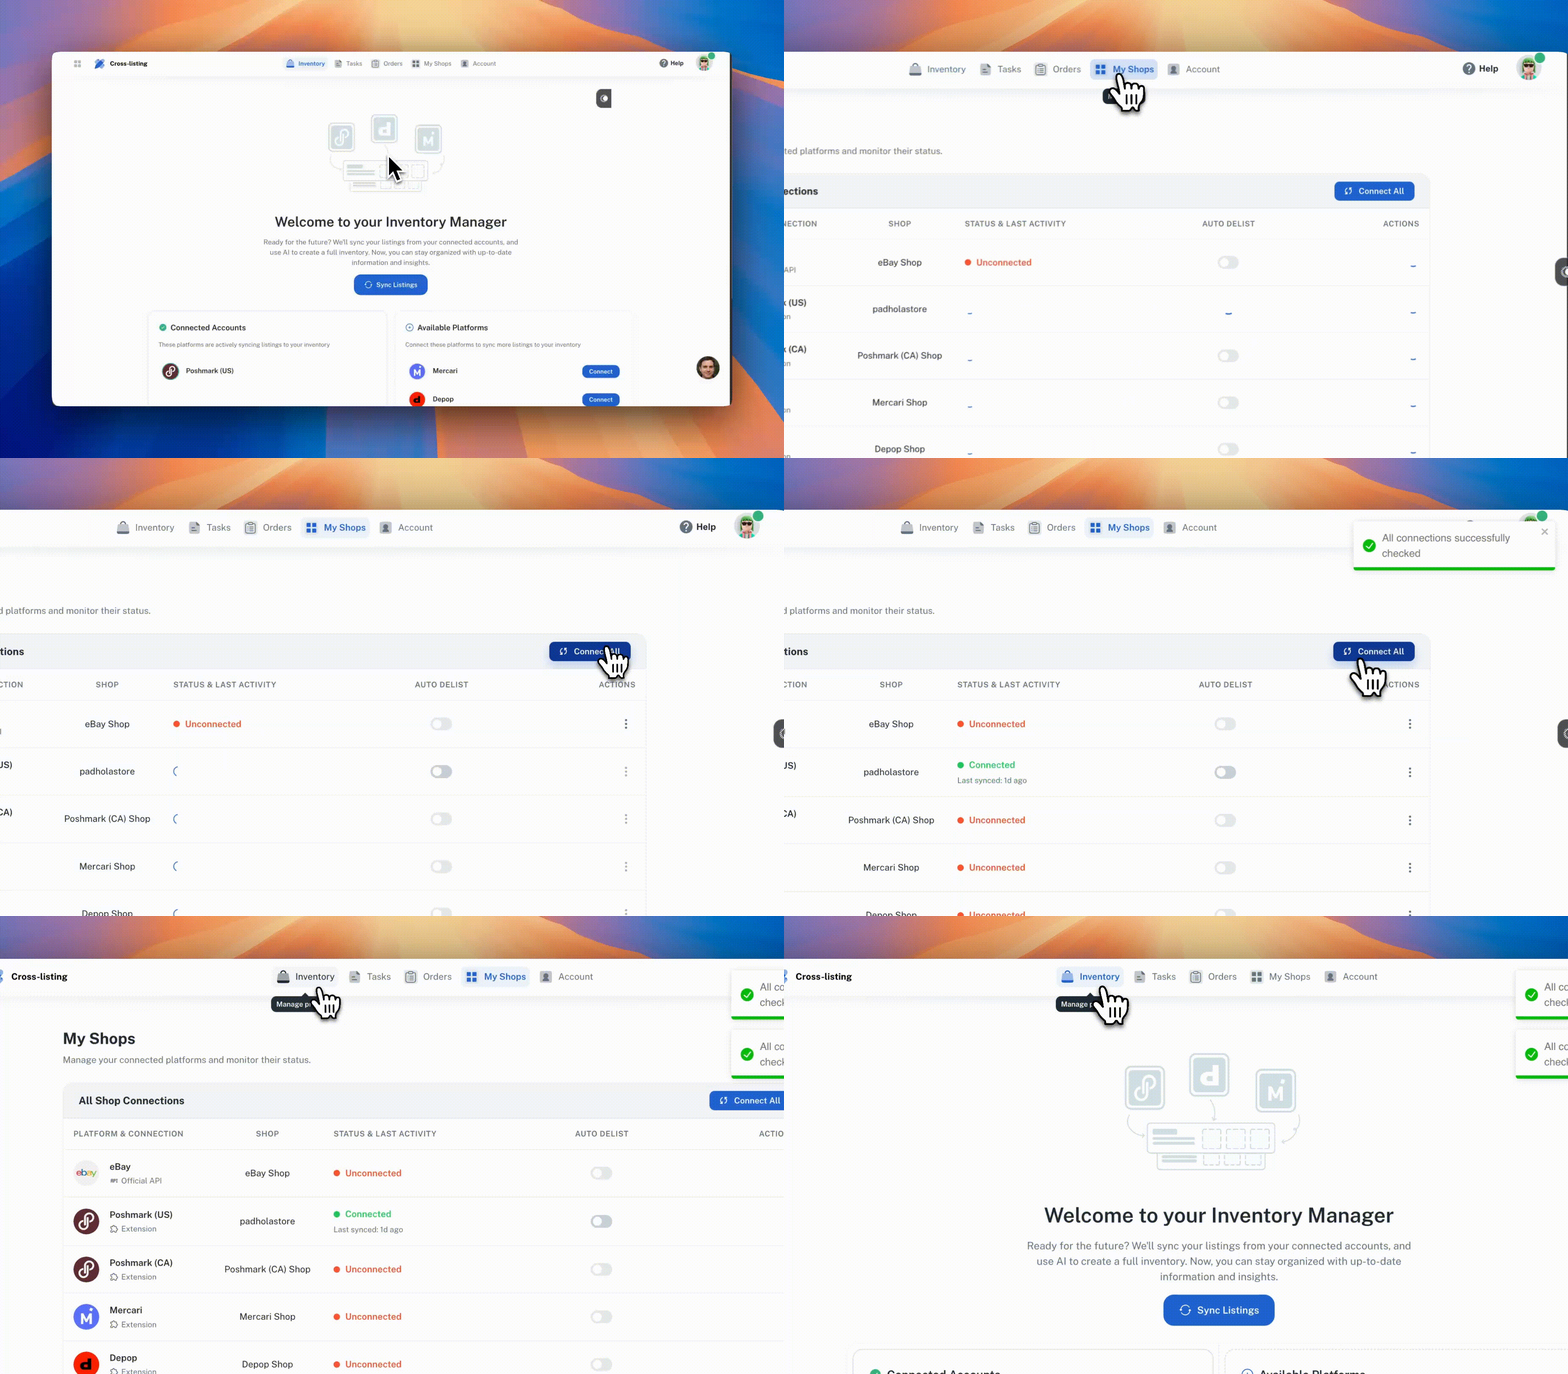
If you haven't connected your store yet, go to the **Inventory Manager** and connect the platforms you sell on. Each connected platform will appear under **Connected Accounts**.

To add more platforms, click [**Connect**](https://app.primelister.com/my-shops) next to any platform listed under **Available Platforms**.

<figure><img src="https://2694965679-files.gitbook.io/~/files/v0/b/gitbook-x-prod.appspot.com/o/spaces%2FG6RIJU8HpzCXLZBS9jJ6%2Fuploads%2FVnk2cg08XjTnKb0Xd23e%2Fmyshop_connect.gif?alt=media&amp;token=a995bd73-2508-4055-b283-45a30978d550" alt=""><figcaption></figcaption></figure>

***

#### Step 2 — Sync Your Listings

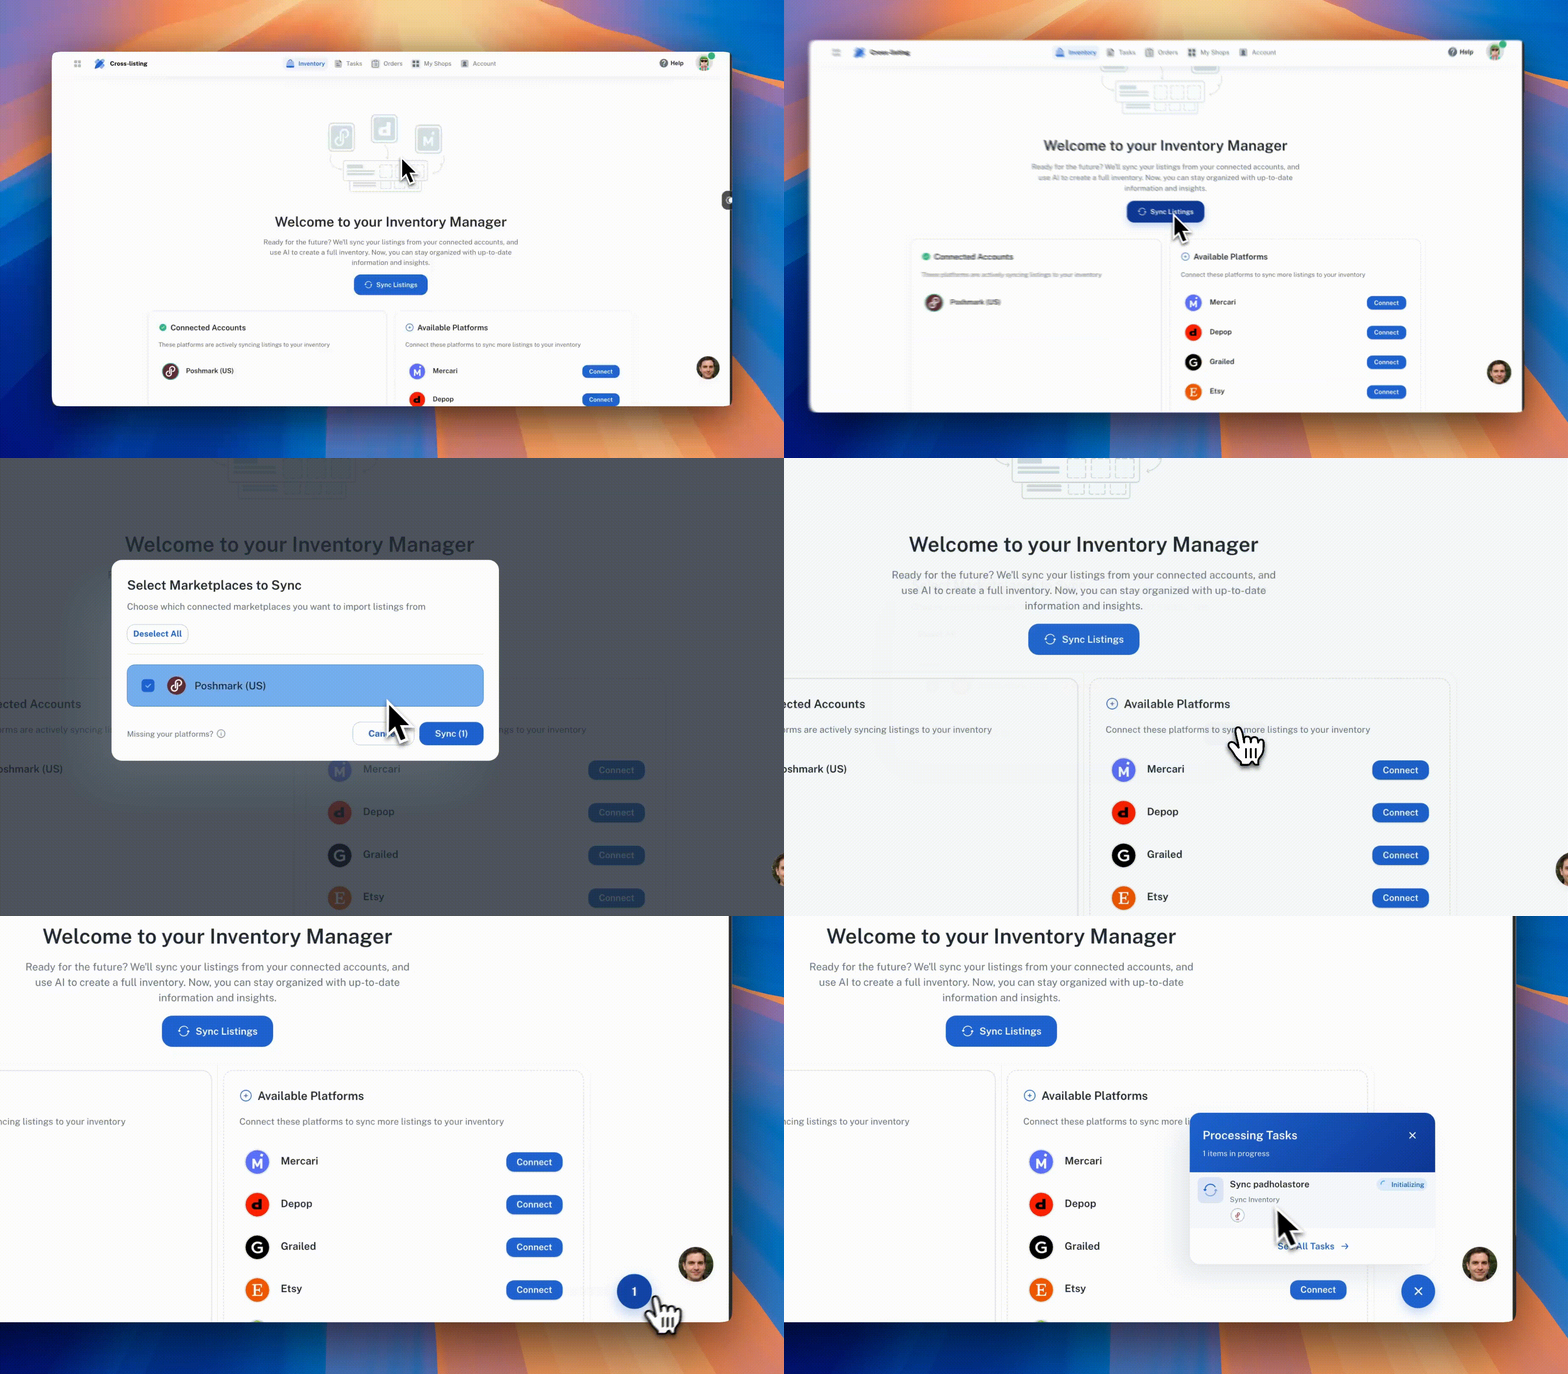
Once your store is connected, click the **Sync Listings** button at the top of the Inventory Manager page.

PrimeLister will automatically import all your active listings from your connected accounts — up to 5,000 items per store.

<figure><img src="https://2694965679-files.gitbook.io/~/files/v0/b/gitbook-x-prod.appspot.com/o/spaces%2FG6RIJU8HpzCXLZBS9jJ6%2Fuploads%2FzkIUWwyWZSCZ6ieCdQ59%2Fsync.gif?alt=media&amp;token=3a1b23c7-e4c1-4075-a6f5-04568d6538a3" alt=""><figcaption></figcaption></figure>

***

#### Step 3 — Track the Task Results

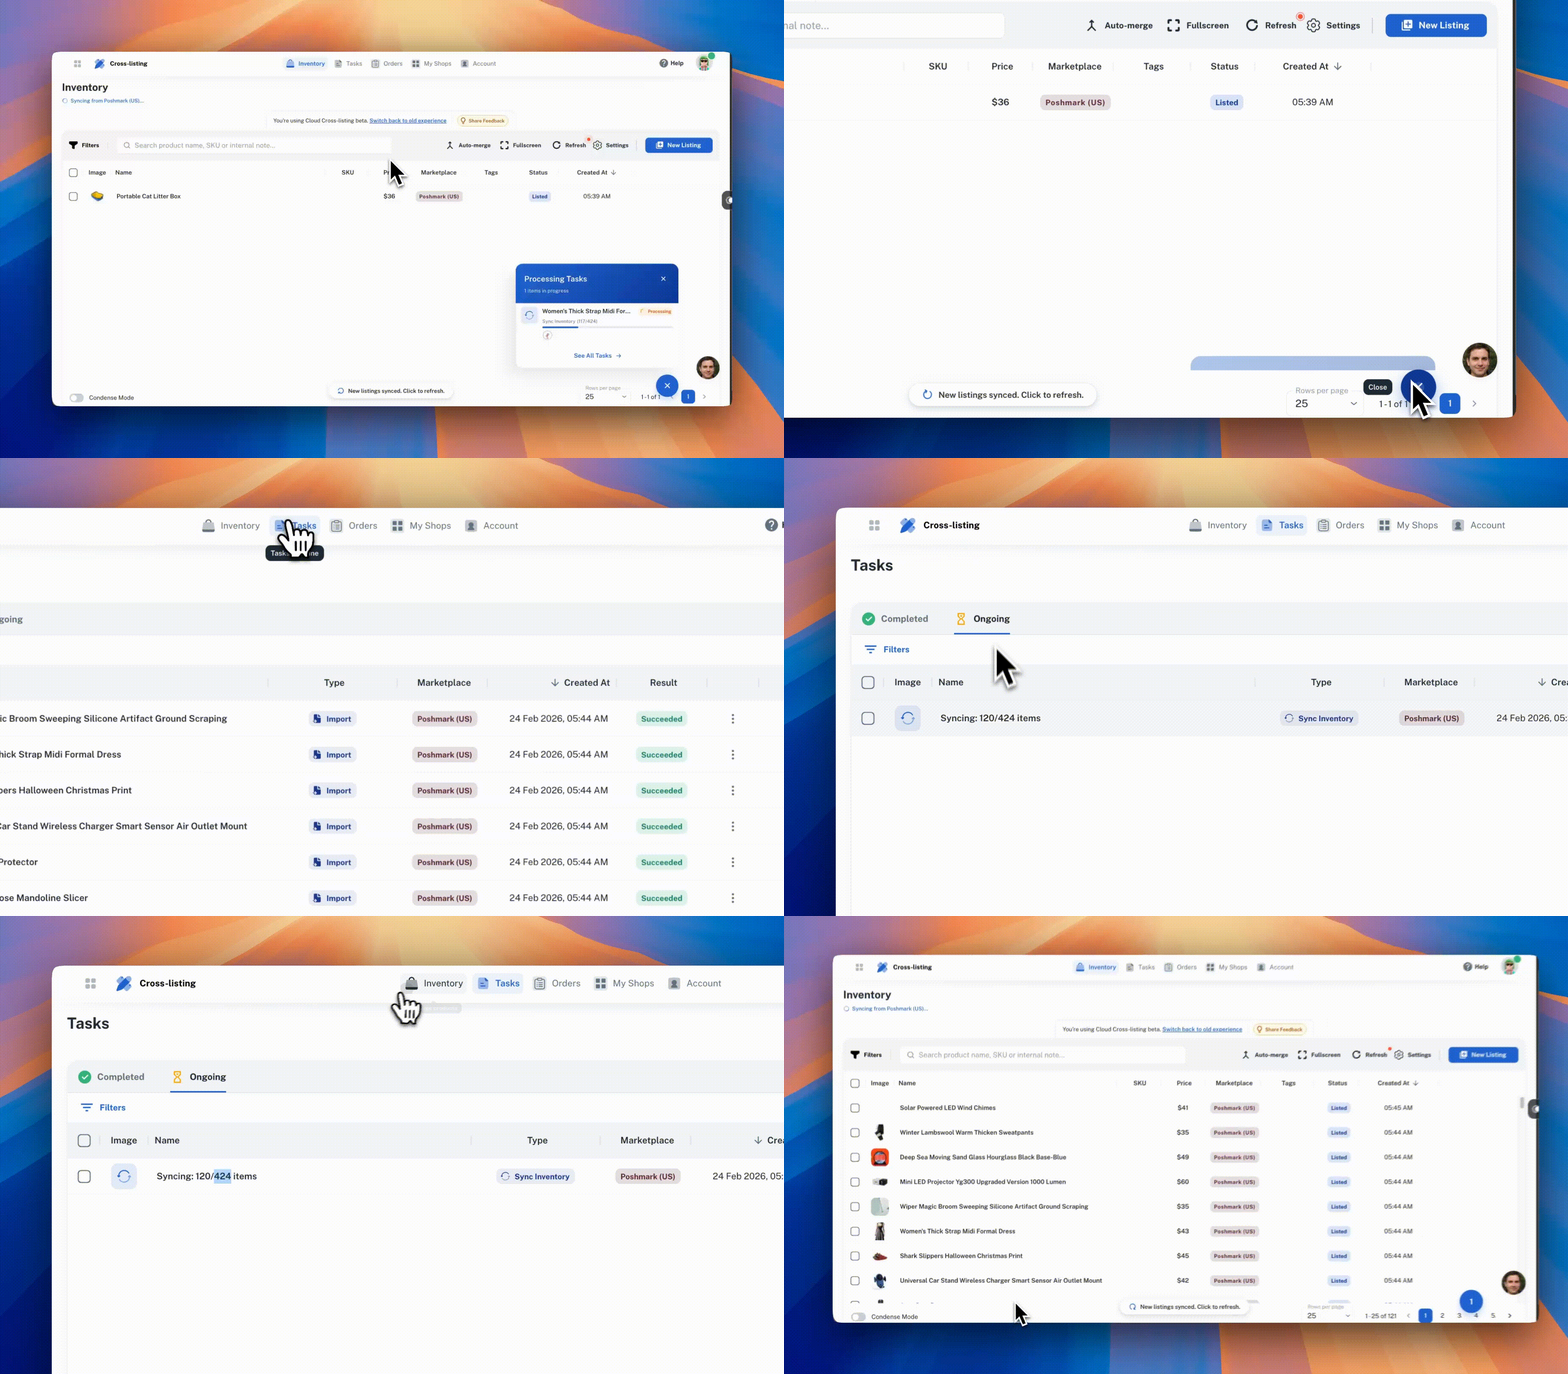
After syncing, you can monitor the progress and results of your sync under the **Tasks** tab in the top navigation bar. Each sync run is logged as a task, so you can see exactly what was imported, how many listings were processed, and whether anything needs your attention.

<figure><img src="https://2694965679-files.gitbook.io/~/files/v0/b/gitbook-x-prod.appspot.com/o/spaces%2FG6RIJU8HpzCXLZBS9jJ6%2Fuploads%2FPU2oKphNkcFOaa70SU4p%2Ftask_track.gif?alt=media&amp;token=ef4741a5-b641-47be-96ea-a21502ffb925" alt=""><figcaption></figcaption></figure>

#### Step 4 — Manage Your Inventory

After the sync is complete, all your listings will appear in your Inventory Manager. From here you can:

* 📋 Browse and search your full inventory across all platforms
* 🔄 Re-sync at any time to pull in new or updated listings
* 📊 Get a clear, organized view of everything you have listed

***

### FAQ

**How often should I sync?** \
Sync whenever you add new listings or make significant changes to your store. There's no automatic sync schedule — you control when it runs.

**Is there a limit on how many listings I can sync?** \
No, there's no limit on Mercari, Depop, Grailed, Etsy, Shopify, or eBay — all of your active listings will be imported. The only exception is Poshmark, which is capped at 5,000 items because that's the maximum number of listings Poshmark itself shows in the closet page.

**Why can't PrimeLister import more than 5,000 items from Poshmark?** \
Poshmark's closet page only loads up to 5,000 listings, even if your closet has more. Since PrimeLister imports the items Poshmark makes visible, anything beyond the 5,000-item cap can't be accessed. This isn't a PrimeLister limit — it's a Poshmark-side restriction.

**Can I connect multiple stores from the same platform?** \
Yes. You can connect multiple accounts and each one will sync into your inventory separately.

**Does syncing affect my live listings?** \
No. Sync is read-only — it imports your listing data into PrimeLister but does not make any changes to your listings on the marketplace.


# 🔀 The Ultimate Guide to Cloud Cross-Listing

Stop babysitting your listings. Use PrimeLister's Cloud Cross-Listing: select items, start the task, and our servers do the work—even if you close your browser.

#### Part 1: Meet Your New Time-Saver: Cloud Cross-Listing! ✨

**1.1: Introduction: What is Cloud Cross-Listing?**

Tired of keeping countless browser tabs open just to cross-list your inventory? We heard you! Introducing Cloud Cross-Listing, the biggest upgrade to your reselling workflow.

This is the "perfect feature" you've been waiting for. Until now, cross-listing (even with automation) required your computer to be on and a browser tab to be active, processing items one by one.

Cloud Cross-Listing changes everything. This new feature means you can launch a task from your PrimeLister Inventory, and *we* handle the rest on our servers. You can select 10, 100, or even more items, start the task, and then feel free to close your browser or shut down your computer. It's a true "set it and forget it" solution, designed so you "will not do anything manually."

**1.2: The "Magic" - How It's Different**

Let's break down the simple, non-technical difference:

* Traditional Cross-listing: Requires your computer to be on and a browser tab to be open to process each item. It's great for listing a few items at a time while you work.
* NEW Cloud Cross-listing: You send a *batch* of items to our "cloud." Our secure system then posts them for you in the background. This is the ultimate tool for bulk actions, saving you hours of time and freeing up your computer.

**1.3: Supported Marketplaces**

This beta feature is powerful and currently supports cross-listing to the following marketplaces:

| **Marketplace** | **Status**            |
| --------------- | --------------------- |
| Poshmark (US)   | ✅ Currently Supported |
| Poshmark (CA)   | ✅ Currently Supported |
| Mercari         | ✅ Currently Supported |
| Depop           | ✅ Currently Supported |
| eBay            | ✅ Currently Supported |
| Etsy            | ⏳ Coming Soon         |
| Facebook        | ⏳ Coming Soon         |
| Shopify         | ⏳ Coming Soon         |
| Grailed         | ⏳ Coming Soon         |

💡 Keep an eye on our product changelog for updates.

***

#### Part 2: Your One-Time Setup Checklist (Get Ready for Launch!) ✅

**Introduction to the Setup**

Before you can launch your first cloud list, you need to complete a simple, one-time setup. This should take about 5-10 minutes. We'll walk you through every step.

This setup is a strict, four-task process. Each task enables the next, so it's important to follow them in this exact order. For example, you cannot configure your shipping presets until you have connected your shops.

#### **Task 1 - Install & Pin the PrimeLister Chrome Extension**

<figure><img src="https://2694965679-files.gitbook.io/~/files/v0/b/gitbook-x-prod.appspot.com/o/spaces%2FG6RIJU8HpzCXLZBS9jJ6%2Fuploads%2F1ibK7YYguXBsCH3ZggeX%2Finstall_chrome_extension.gif?alt=media&amp;token=188ebdd7-51f1-42ca-839c-d18c1594ec59" alt=""><figcaption></figcaption></figure>

This is the most critical prerequisite for all PrimeLister automation, including Cloud Cross-Listing.

Instructions:

1. Open the Google Chrome browser on your computer. This feature specifically requires the Chrome browser to function.
2. Go to the Chrome Web Store using this direct link:

   <https://chromewebstore.google.com/detail/eepbhjeldlodgnndnjofcnnoampciipg>
3. Click the blue Add to Chrome button.
4. A pop-up will ask for permission; click Add extension.

💡 Pro-Tip: You MUST Pin the Extension!

#### **Task 2 - Connect Your Marketplace Shops**

<figure><img src="https://2694965679-files.gitbook.io/~/files/v0/b/gitbook-x-prod.appspot.com/o/spaces%2FG6RIJU8HpzCXLZBS9jJ6%2Fuploads%2FTAJktQlFdig5XPKGLzMJ%2Fmyshops_connection.gif?alt=media&amp;token=019a9c23-7685-45da-8c8e-fead4076ffcd" alt=""><figcaption></figcaption></figure>

Now that the extension is installed, let's connect your shops to your PrimeLister account.

Instructions:

1. Navigate to the My Shops page in your PrimeLister account:

   <https://app.primelister.com/my-shops>
2. Click the Connect or Refresh button for each marketplace you've logged into. The extension will automatically detect your logged-in session and link it to PrimeLister.

#### **Task 3 - Activate Beta Features**

<figure><img src="https://2694965679-files.gitbook.io/~/files/v0/b/gitbook-x-prod.appspot.com/o/spaces%2FG6RIJU8HpzCXLZBS9jJ6%2Fuploads%2FHnek1O2ekfxtv6tqci0p%2Fenable_beta_futures.gif?alt=media&amp;token=a6121c05-2b4a-4ed3-b8e2-ca5af4bca3e3" alt=""><figcaption></figcaption></figure>

Cloud Cross-Listing is a new, advanced feature. To see it in your account, you must opt-in to our beta program (don't worry, it's just a single click!).

Instructions:

1. Navigate to your Account page:

   <https://app.primelister.com/user#general>
2. Scroll down to the 'Preferences' section.
3. Find the Enable Beta Features toggle and click it.
4. When the toggle is on (it will turn blue), you're all set!
5. Congratulations, you now have early access to our newest and most powerful tools!

#### Task 4 - Configure Your Shipping Presets <a href="#configure-your-shipping-presets" id="configure-your-shipping-presets"></a>

<figure><img src="https://2694965679-files.gitbook.io/~/files/v0/b/gitbook-x-prod.appspot.com/o/spaces%2FG6RIJU8HpzCXLZBS9jJ6%2Fuploads%2FtZ0hQjG6wAVOGNj98jb2%2Fshipping_Set.gif?alt=media&amp;token=0a6aef44-3fcb-46a0-a3b6-24654d4f2b37" alt=""><figcaption></figcaption></figure>

This is the final—and most important—step for ensuring your *cloud* tasks work perfectly.

{% hint style="danger" %}
Important Prerequisite: You *must* have your shops connected (Task 2) *before* you can set up shipping. The settings on this page are tied to your specific, connected accounts.&#x20;
{% endhint %}

Instructions:

1. Navigate to your Inventory Settings page:

   <https://app.primelister.com/inventory/settings>
2. On this page, you will see sections for each marketplace you've connected (e.g., Poshmark, Mercari, Depop).
3. Click Add Marketplace (or edit an existing one) for each shop you want to use with Cloud Cross-Listing.
4. Carefully fill in your default shipping methods for *each* marketplace.

{% hint style="info" %}
Why is this so important?

When a task is running in the "cloud" on our servers, it cannot stop and ask you for shipping information. It must pull that data from these presets. This is how PrimeLister knows exactly what shipping options to select when it lists for you.

A task will fail if this is not set up correctly. Taking two minutes to set your shipping defaults here will save you hours of time later.
{% endhint %}

**2.6: The Setup Checklist**

Let's review. Once you've completed this one-time setup, you are ready to use Cloud Cross-Listing forever.

| **Setup Task**                 | **Where to Find It**               | **Done?** |
| ------------------------------ | ---------------------------------- | --------- |
| Install & Pin Chrome Extension | `Chrome Web Store` / `Puzzle Icon` | ☐         |
| Connect Your Shops             | `My Shops` Page                    | ☐         |
| Enable Beta Features           | `Account` Page > `General`         | ☐         |
| Configure Shipping Settings    | `Inventory` > `Settings`           | ☐         |

Once all four boxes are checked, you are ready for the fun part!

***

#### Part 3: How to Launch Your First Cloud Cross-List 🚀

**3.1: Introduction to the Workflow**

You've completed the one-time setup. Now for the easy part! This is the simple, repeatable workflow you'll follow every time you want to cross-list your items.

**3.2: Step 1 - Go to Your Inventory**

Navigate to your PrimeLister [Inventory tab](https://app.primelister.com/inventory?order=desc\&orderBy=createdAt\&rowsPerPage=25), your central hub for all imported items.

<figure><img src="https://2694965679-files.gitbook.io/~/files/v0/b/gitbook-x-prod.appspot.com/o/spaces%2FG6RIJU8HpzCXLZBS9jJ6%2Fuploads%2FdqTityraqQRvIq7mU15h%2Fimport_items.gif?alt=media&amp;token=e86f8627-9656-44f6-bcb8-8663c893fac3" alt=""><figcaption></figcaption></figure>

**3.2: Step 2 - Select Items and Launch the Cloud Task**

<figure><img src="https://2694965679-files.gitbook.io/~/files/v0/b/gitbook-x-prod.appspot.com/o/spaces%2FG6RIJU8HpzCXLZBS9jJ6%2Fuploads%2FYe5I71aoMHwco9jeQhQs%2Fcrosslist_items.gif?alt=media&amp;token=7e83c6c3-fd97-4822-9a01-e5f524c70bab" alt=""><figcaption></figcaption></figure>

Click the checkboxes next to the items you want to cross-list. You can select one item or hundreds!

With your items selected, click the Cross-List button.

1. Select your target marketplace(s) (e.g., Mercari, Depop).
2. This is the magic button: Look for the toggle labeled 'Use Cloud Cross-Listing' or 'Run in Background'. Make sure this is enabled!
3. Click 'Crosslist' button.

**3.3: Step 3 - You're Done! (Really.)**

And that's it! 🥳

You can now close the tab, browse other pages in PrimeLister, or even turn off your computer. PrimeLister's servers have received your task and will now begin processing your items in the background.

***

#### Part 4: Monitoring Your Queue & Pro-Tips

**4.1: How to Track Your Task Progress**

Want to check on your batch? You can monitor the status of every item in real-time.

Instructions:

1. Navigate to the [Tasks](https://app.primelister.com/tasks?order=desc\&orderBy=createdDate\&rowsPerPage=25\&tab=COMPLETED) page from the main navigation bar:

<figure><img src="https://2694965679-files.gitbook.io/~/files/v0/b/gitbook-x-prod.appspot.com/o/spaces%2FG6RIJU8HpzCXLZBS9jJ6%2Fuploads%2F4HdUsrbWAiwOoTErUHPT%2Fcheck_task_results.gif?alt=media&amp;token=78b832ae-7616-4a96-a5f1-62000ac615db" alt=""><figcaption></figcaption></figure>

**4.2: FAQ (Frequently Asked Questions)**

"Can I close my computer while cross-listing?"

* Explanation: Yes! 💻 That's the magic of Cloud Cross-Listing. Once you start the task, it's working in the background on our servers. You can leave, close your computer, or go on vacation.

"How many items can I list at once?"

* Explanation: With Cloud Cross-Listing, you can queue up hundreds of items at once. However, to respect marketplace posting limits and keep your accounts safe, our system will intelligently schedule and space out your listings over a period of time. You get the full power of bulk-listing without any of the risk.

Welcome to the future of reselling. Happy (cloud) listing!


# Auto Delisting

Automatically remove listings across multiple marketplaces when items are sold.

### Overview

PrimeLister's auto-delist feature automatically removes listings across multiple marketplaces when an item is sold. For multi-quantity items, PrimeLister goes one step further: it detects the exact size that sold and updates the stock on your other copies automatically.

This documentation covers the feature's prerequisites, supported platforms, multi-quantity behavior, and important limitations.

{% hint style="warning" %}
📢 **Important:** Only **new orders** placed after enabling automation will appear in your Orders page.
{% endhint %}

### ⚙️ Prerequisites

1. Navigate to your [My-Shops page](https://app.primelister.com/my-shops)
2. Enable the desired auto-delist options for your connected marketplaces

{% embed url="<https://youtu.be/UWz_7aMPTDg>" %}

### 🛍️ Supported Marketplaces

| **Marketplace** | **Automatic Sales Detection (Source)** | **Automatic Delisting (Target)** | **Bundle/Case** |
| --------------- | -------------------------------------- | -------------------------------- | --------------- |
| Poshmark        | ✅                                      | ✅                                | ✅               |
| Etsy            | ✅                                      | ✅                                | ✅               |
| Mercari         | ✅                                      | ✅                                | ❌               |
| Depop           | ✅                                      | ✅                                | ✅               |
| eBay            | ✅                                      | ✅                                | ✅               |
| Grailed         | ❌                                      | ✅                                | ✅               |
| Shopify         | ❌                                      | ✅                                | ✅               |
| Facebook        | ❌                                      | ❌                                | ❌               |

Currently, automatic sales detection is supported on:

* ✅ Sales Detection: Poshmark, Mercari, eBay, Etsy, Depop
* ✅ Auto-Delist works on: Poshmark, Mercari, eBay, Etsy, Depop, Grailed, Shopify
* ❌ Not supported: Facebook Marketplace (manual deletion required)

{% hint style="info" %}
While the auto-delist feature triggers across all linked marketplaces, the Orders page displays orders from Poshmark, eBay, Etsy, Mercari, and Depop. Mercari bundles are not supported for now.
{% endhint %}

### 📦 Multi-Quantity & Multi-Size Support

When a multi-quantity item sells on one marketplace, PrimeLister automatically updates the stock on your **Poshmark (US & CA)**, **Depop**, and **eBay** copies. No more "multi-item" errors and no more manual quantity juggling for these marketplaces.

#### 🎯 Size-Aware Stock Updates

PrimeLister detects **which size sold** and reduces stock **only for that size**. Your other sizes stay live and keep selling.

**Example:** Your Poshmark listing has 3 sizes in stock. A size **M** sells on Depop.

| Size  | Before | After |
| ----- | ------ | ----- |
| S     | 2      | 2     |
| **M** | **3**  | **2** |
| L     | 1      | 1     |

Only the M row changes. S and L are untouched and remain available for buyers.

On eBay, listings with multiple variation dimensions (for example Size × Color) are supported too: PrimeLister identifies the exact variation that sold and reduces only that variation's stock.

{% hint style="success" %}
**💡 Why this matters:** Most crosslisting tools track a single quantity number per listing. PrimeLister works at the **size level**: it knows exactly which size sold and adjusts only that size's stock, so the rest of your inventory keeps selling without interruption.
{% endhint %}

#### 📌 Good to Know

* 🎁 **Bundles**: if a buyer purchases multiple sizes in one order (for example S + M), each size's stock is reduced separately
* 1️⃣ **Single-quantity copies** stay live while the item still has stock on other marketplaces. Once the item is completely sold out, the copy is delisted automatically
* 🔒 **Each order is counted exactly once**: your stock is never reduced twice for the same sale

### ⚠️ Important Limitations

#### Multi-Quantity on Other Marketplaces

Size-level stock updates currently work when the copy is on **Poshmark (US & CA)**, **Depop**, or **eBay**. For multi-quantity items on other marketplaces (Mercari, Etsy, Grailed, Shopify):

* The system will mark these items as "<mark style="color:orange;">**Action Required**</mark>" status
* You will need to manage these items manually
* You can view all skipped items in the Orders page under the "Related Items" section

#### When PrimeLister Asks for Your Help

Even on Poshmark, Depop, and eBay, a few situations cannot be resolved safely. In those cases the order is marked as "<mark style="color:orange;">**Action Required**</mark>" instead of guessing:

* The sold size does not exist on the copy (for example an XXL sold, but the copy only has S / M / L)
* The order does not include size information for a multi-size listing
* The copies of the item have different size setups

{% hint style="warning" %}
**PrimeLister never guesses.** Reducing stock from the wrong size is worse than asking you to check. When a size cannot be matched with certainty, the listing is left untouched and flagged for your review.
{% endhint %}

### ☁️ Cloud-Based Processing

PrimeLister operates as a cloud service to manage your marketplace operations:

* **How It Works**:
  * The extension stores your marketplace cookies securely through the My-Shops page
  * All auto-delist operations run on cloud servers
  * Your computer does not need to be turned on for the service to work
* **Cookie Management**:
  * Invalid cookies are the only reason auto-delist might pause
  * If this happens:
    1. Simply visit and log in to the affected marketplace
    2. Your cookies will automatically update
    3. Use the Orders page's manual delist buttons to quickly process any missed items

### 📊 Monitoring and Management

1. Navigate to the Orders page
2. Check the "Related Items" section for:
   * Successfully delisted items
   * <mark style="color:orange;">**Action Required**</mark> items requiring manual attention
   * Status updates across all connected marketplaces

#### Related Items Processing

The system handles related items based on several conditions:

1. Order Detection:
   1. When a sale is detected, the system first checks your inventory
   2. Items must be properly mapped in your inventory for auto-delist to function

      <div align="left"><figure><img src="https://2694965679-files.gitbook.io/~/files/v0/b/gitbook-x-prod.appspot.com/o/spaces%2FG6RIJU8HpzCXLZBS9jJ6%2Fuploads%2F4a2eMukEkKPG5ncfjhYw%2FScreenshot%202025-01-10%20at%203.57.00%E2%80%AFPM.png?alt=media&#x26;token=622dc536-fd5f-4728-a0ab-881099380ce9" alt="" width="563"><figcaption></figcaption></figure></div>
2. Failed Delist Retry:
   * When PrimeLister attempts to delist an item but fails:

     * The failed attempt will be logged in the Related Items section
     * A "Delist" button will appear next to the failed item
     * You can manually trigger the delist process again using this button

     <figure><img src="https://2694965679-files.gitbook.io/~/files/v0/b/gitbook-x-prod.appspot.com/o/spaces%2FG6RIJU8HpzCXLZBS9jJ6%2Fuploads%2FWgCSDHjut0D1R91qBmxJ%2FScreenshot%202025-01-10%20at%204.00.25%E2%80%AFPM.png?alt=media&#x26;token=1a0c6675-1024-4248-815d-163b43dcd2b8" alt=""><figcaption></figcaption></figure>

#### Status Tracking

* Successfully delisted items will be marked as <mark style="color:green;">**Succeeded**</mark>
* Items requiring manual attention will be marked as <mark style="color:orange;">**Action Required**</mark> or <mark style="color:red;">**Failed**</mark>


# Relist

Learn more about the re-listing feature. 🤓

## Relist - Articles 📚

{% content-ref url="/pages/uFjJ6ccrl2c2kxpHssnj" %}
[How to Bulk Relist on Poshmark](/features/cross-lister-tool/relist/how-to-bulk-relist-on-poshmark)
{% endcontent-ref %}

{% content-ref url="/pages/PbmCOKbe201HtiUp3eMu" %}
[How to Schedule Relist on Poshmark](/features/cross-lister-tool/relist/how-to-schedule-relist-on-poshmark)
{% endcontent-ref %}

{% content-ref url="/pages/QAYtLPmp7ZmRRBmPESJK" %}
[How to Relist on Mercari](/features/cross-lister-tool/relist/how-to-relist-on-mercari)
{% endcontent-ref %}

{% content-ref url="/pages/KMLmTdJCBhzSjZmhkJcl" %}
[How to Schedule Relist on Mercari](/features/cross-lister-tool/relist/how-to-schedule-relist-on-mercari)
{% endcontent-ref %}

{% content-ref url="/pages/RDlWkVQHOT8eqmM8PDDM" %}
[How to Import Mercari Listings on Inventory Panel](/features/cross-lister-tool/import/how-to-relist-mercari-listings-on-inventory-panel)
{% endcontent-ref %}

{% content-ref url="/pages/ButS09rhWhwunQQbHTkr" %}
[How to Relist Items on Instagram](/features/cross-lister-tool/relist/how-to-relist-items-on-instagram)
{% endcontent-ref %}


# How to Bulk Relist on Poshmark

{% embed url="<https://youtu.be/sygEC1QlvB8>" %}

### Steps: <a href="#steps" id="steps"></a>

1. Navigate to your Poshmark Closet page.&#x20;
2. Select the listings that you want to relist.&#x20;
3. Click on the "Slide bar" button which is on the right corner of your screen.&#x20;
4. Click on the "Relist" button from the menu.&#x20;
5. It will open a new tab in your browser and the task will be operated automatically. Please do not close this tab. It will be closed automatically when the task is done.


# How to Schedule Relist on Poshmark

{% embed url="<https://youtu.be/gan-LnXS0n4>" %}

**Steps:**

1. Navigate to your Poshmark Closet page.&#x20;
2. Select the listing(s) that you want to relist.&#x20;
3. Click on the "Slide bar" button which is on the right corner of your screen.&#x20;
4. Click on the "Relist" button from the menu.&#x20;
5. Click on the "Schedule" button.&#x20;
6. Select the date you want to do the action and press the schedule button.&#x20;
7. When the predefined time comes, a new tab in your browser will be opened and the task will be done automatically. Please do not close this tab. It will be closed automatically when the task is done.


# How to Relist on Mercari

{% embed url="<https://youtu.be/2nN78vyyP64>" %}

**Steps:**

1. Navigate to your Mercari Listings page.&#x20;
2. Select the listing(s) that you want to relist.&#x20;
3. Click on the "Slide bar" button which is on the right corner of your screen.
4. Click on the "Relist" button from the menu.
5. It will open a new tab in your browser and the task will be operated automatically. Please do not close this tab. It will be closed automatically when the task is done.

**Mercari Tips:** The best way to boost your engagement on Mercari is relisting your items regularly.&#x20;

"Relist" feature of PrimeLister allows you to relist your listings automatically.&#x20;

Relisting stands for the task of deleting the stale listings and then publishing a new copy of them.&#x20;

According to your preference, the relisting feature can be operated on a single listing or a bulk listing as well as all listings. The relisting feature can be used for both active and inactive listings.


# How to Schedule Relist on Mercari

{% embed url="<https://youtu.be/XtYKiedheew>" %}

**Steps:**

1. Navigate to your Mercari Listings page.&#x20;
2. Select the listing(s) that you want to relist.&#x20;
3. Click on the "Slide bar" button which is on the right corner of your screen.&#x20;
4. Click on the "Relist" button from the menu.&#x20;
5. Click on the "Schedule" button.&#x20;
6. Select the date you want to do the action and press the schedule button.&#x20;
7. When the predefined time comes, a new tab in your browser will be opened and the task will be done automatically. Please do not close this tab. It will be closed automatically when the task is done.


# How to Relist Items on Instagram

**Steps:**

1. Navigate to your Instagram store Page.&#x20;
2. Select the listings that you want to relist.&#x20;
3. Click on the "Slide bar" button which is on the right corner of your screen.&#x20;
4. Click on the "Relist" button from the dropdown menu.&#x20;
5. It will open new tabs in your browser and the task will be operated automatically. Please do not close this tab.


# Import

Learn more about the importing feature. 🤓

## Import - Articles 📚

{% content-ref url="/pages/7jotgrZRUWTQCg2H72bm" %}
[How to Import Poshmark Listings on Inventory Panel](/features/cross-lister-tool/import/how-to-import-poshmark-listings-on-inventory-panel)
{% endcontent-ref %}

{% content-ref url="/pages/c6v6jBbibMUeP2pm4LCv" %}
[How to Import a Poshmark Listing to PrimeLister Inventory Panel](/features/cross-lister-tool/import/how-to-import-poshmark-listings-to-inventory-panel)
{% endcontent-ref %}

{% content-ref url="/pages/yGgX1m7yrdCeQCeCbYiR" %}
[How to Import Mercari Listings on Inventory Panel](/features/cross-lister-tool/import/how-to-import-mercari-listings-on-inventory-panel)
{% endcontent-ref %}

{% content-ref url="/pages/m8XnS1hMujeF5ol9UVGV" %}
[How to Import a Mercari Listing to PrimeLister Inventory Panel](/features/cross-lister-tool/import/how-to-import-mercari-listings-to-inventory-panel)
{% endcontent-ref %}

{% content-ref url="/pages/iAXDKCD0UB3AJInHzzSF" %}
[How to Import an Instagram Listing to PrimeLister Inventory Panel](/features/cross-lister-tool/import/how-to-import-an-instagram-listing-to-inventory-panel)
{% endcontent-ref %}

{% content-ref url="/pages/AFMIR566KPKBi7JYYsyW" %}
[How to Import eBay Listings on Inventory Panel](/features/cross-lister-tool/import/how-to-import-ebay-listings-on-inventory-panel)
{% endcontent-ref %}

{% content-ref url="/pages/WtlMVj1cuwKmUxtPWwnM" %}
[How to Import Items from Etsy to PrimeLister Inventory Panel](/features/cross-lister-tool/import/how-to-import-etsy-items-to-prime-lister-inventory-panel)
{% endcontent-ref %}

{% content-ref url="/pages/R4ya9yZHaYbAVgdC0Cpj" %}
[How to Import Etsy Listings on Inventory Panel](/features/cross-lister-tool/import/how-to-import-etsy-listings-on-inventory-panel)
{% endcontent-ref %}

{% content-ref url="/pages/CvINDldrEwO3c69Clo6g" %}
[How to Import a Facebook Marketplace Listing to PrimeLister Inventory Panel](/features/cross-lister-tool/import/how-to-import-a-facebook-marketplace-listing-to-inventory-panel)
{% endcontent-ref %}

{% content-ref url="/pages/hHD7CgnvVGZ5Wt2RNsQX" %}
[How to Import Facebook Marketplace Listings on Inventory Panel](/features/cross-lister-tool/import/how-to-import-facebook-marketplace-listings-on-inventory-panel)
{% endcontent-ref %}

{% content-ref url="/pages/BBXo1jL6Kz4ObmKThRsM" %}
[How to Import Depop Listings on Inventory Panel](/features/cross-lister-tool/import/how-to-import-depop-listings-on-inventory-panel)
{% endcontent-ref %}

{% content-ref url="/pages/SWrZPirRo34Qm5GFPH1d" %}
[How to Import Items from Depop to PrimeLister Inventory Panel](/features/cross-lister-tool/import/how-to-import-items-from-depop-to-prime-lister-inventory-panel)
{% endcontent-ref %}


# How to Import Poshmark Listings on Inventory Panel

{% embed url="<https://youtu.be/r2ZTdXkqfME>" %}

**Steps:**

1. Navigate to your PrimeLister Inventory Panel Page.&#x20;
2. Click on the "Import Listings" button which is on the right side of the page.
3. Click on the "From Poshmark" button from the dropdown menu.
4. Select the listings that you want to Import.&#x20;
5. Click on the ''Import Listings'' button.
6. It will open new tabs in your browser and the task will be operated automatically. Please do not close this tab.


# How to Import a Poshmark Listing to PrimeLister Inventory Panel

{% embed url="<https://youtu.be/GS3neMpqrm8>" %}

**Steps:**

1. Navigate to your Poshmark Closet page.&#x20;
2. Select the listings that you want to import.&#x20;
3. Click on the "Slide bar" button which is on the right corner of your screen.
4. Click on the "Import" button from the menu.&#x20;
5. It will open a new tab in your browser and the task will be operated automatically. Please do not close this tab. It will be closed automatically when the task is done.


# How to Import Mercari Listings on Inventory Panel

{% embed url="<https://youtu.be/EjzBKSVCBLc>" %}

**Steps:**

1. Navigate to your PrimeLister Inventory Panel Page.&#x20;
2. Click on the "Import Listings" button which is on the right side of the page.&#x20;
3. Click on the "From Mercari" button from the dropdown menu.&#x20;
4. Select the listings that you want to Import.&#x20;
5. Click on the ''Import Listings'' button. It will open new tabs in your browser and the task will be operated automatically. Please do not close this tab.


# How to Import a Mercari Listing to PrimeLister Inventory Panel

{% embed url="<https://youtu.be/5ylMm3uED1g>" %}

**Steps:**

1. Navigate to your Mercari store page.&#x20;
2. Select the listings that you want to import.&#x20;
3. Click on the "Slide bar" button which is on the right corner of your screen&#x20;
4. Click on the "Import" button from the menu.&#x20;
5. It will open a new tab in your browser and the task will be operated automatically. Please do not close this tab. It will be closed automatically when the task is done.


# How to Import an Instagram Listing to PrimeLister Inventory Panel

**Steps:**

1. Navigate to your Instagram store page.&#x20;
2. Select the listings that you want to import.&#x20;
3. Click on the "Slide bar" button which is on the right corner of your screen.&#x20;
4. Click on the "Import" button from the dropdown menu.&#x20;
5. It will open new tabs in your browser and the task will be operated automatically. Please do not close this tab.


# How to Import eBay Listings on Inventory Panel

{% embed url="<https://youtu.be/UOdkra0m9Cs>" %}

**Steps:**

1. Navigate to your PrimeLister Inventory Panel Page.&#x20;
2. Click on the "Import Listings" button which is on the right side of the page.&#x20;
3. Click on the "From eBay” button from the dropdown menu.&#x20;
4. Select the listings that you want to Import.&#x20;
5. Click on the ''Import Listings'' button.&#x20;
6. It will open new tabs in your browser and the task will be operated automatically. Please do not close this tab.


# How to Import Items from Etsy to PrimeLister Inventory Panel

{% embed url="<https://youtu.be/CHBn04HFyNg>" %}

**Steps:**

1. Navigate to your Etsy store page.&#x20;
2. Select the listings that you want to import.&#x20;
3. Click on the "Slide bar" button which is on the right side of your screen&#x20;
4. Click on the "Import" button from the menu.&#x20;
5. It will open a new tab in your browser and the task will be operated automatically. Please do not close this tab. It will be closed automatically when the task is done.


# How to Import Etsy Listings on Inventory Panel

{% embed url="<https://youtu.be/jjkrS0wqafw>" %}

**Steps:**

1. Navigate to your PrimeLister Inventory Panel Page.&#x20;
2. Click on the "Import Listings" button which is on the right side of the page.&#x20;
3. Click on the "From Etsy” button from the dropdown menu.&#x20;
4. Select the listings that you want to Import.&#x20;
5. Click on the ''Import Listings'' button.&#x20;
6. It will open new tabs in your browser and the task will be operated automatically. Please do not close this tab.


# How to Import a Facebook Marketplace Listing to PrimeLister Inventory Panel

**Steps:**

1. Navigate to your Facebook Marketplace store Page.&#x20;
2. Select the listings that you want to import.&#x20;
3. Click on the "Slide bar" button which is on the right corner of your screen.&#x20;
4. Click on the "import" button from the dropdown menu.&#x20;
5. It will open new tabs in your browser and the task will be operated automatically. Please do not close this tab.


# How to Import Facebook Marketplace Listings on Inventory Panel

{% embed url="<https://youtu.be/02mV1eR_QZ0>" %}

**Steps:**

1. Navigate to your PrimeLister Inventory Panel Page.&#x20;
2. Click on the "Slide bar" button which is on the right corner of your screen.&#x20;
3. Click on the "From Facebook” button from the dropdown menu.&#x20;
4. Select the listings that you want to Import.&#x20;
5. Click on the ''Import Listings'' button.&#x20;
6. It will open new tabs in your browser and the task will be operated automatically. Please do not close this tab.


# How to Import Depop Listings on Inventory Panel

{% embed url="<https://youtu.be/e0j2nU1wu0g>" %}

**Steps:**

1. Navigate to your PrimeLister Inventory Panel Page.&#x20;
2. Click on the "Import Listings" button which is on the right side of the page.&#x20;
3. Click on the "From Depop” button from the dropdown menu.&#x20;
4. Select the listings that you want to Import.&#x20;
5. Click on the ''Import Listings'' button.&#x20;
6. It will open new tabs in your browser and the task will be operated automatically. Please do not close this tab.


# How to Import Items from Depop to PrimeLister Inventory Panel

{% embed url="<https://youtu.be/e0j2nU1wu0g>" %}

**Steps:**

1. Navigate to your PrimeLister Inventory Panel Page.&#x20;
2. Click on the "Import Listings" button which is on the right side of the page.&#x20;
3. Click on the "From Depop” button from the dropdown menu.&#x20;
4. Select the listings that you want to Import.&#x20;
5. Click on the ''Import Listings'' button.&#x20;
6. It will open new tabs in your browser and the task will be operated automatically. Please do not close this tab.


# How to Merge Listings on Inventory Panel

{% embed url="<https://youtu.be/ehq08y44ji0>" %}

We developed the "Merge" feature in the Inventory Panel. If the same products are listed on different platforms you can import and merge them.

**Steps:**

1. Navigate to your PrimeLister Inventory Panel Page.&#x20;
2. Select the minimum 2 listings that you want to merge.&#x20;
3. Click on the "Listing Actions" button which is on the right side of the page.&#x20;
4. Click on the "Merge" button from the dropdown menu.&#x20;
5. Click on the ''Merge Listings'' button.&#x20;
6. The task will be operated automatically. Please do not close this tab.


# How to Add Tags and Groups to Your Listings

Tags and Groups help to organize inventory better by segmenting and categorizing items. You can use tags to search details like size or shipping type. You can use groups to post listings in bulk.

### Add Tags and Groups to a Listing

Kindly, follow the instructions shared below:

1. Go to your *Inventory Panel* and click on the **Edit** icon underneath the *Actions* column.
2. Choose/add the desired Tags and Groups.
3. Click on the **Save Changes** button to save the changes.

{% embed url="<https://youtu.be/iuaVL1QZ6Ek>" %}
Add Tags and Groups to a Listing
{% endembed %}

### Add Tags and Groups to Listings in Bulk

You can simply add Tags and Groups in bulk via the *Inventory* page.

#### How to Add Tags in Bulk:

1. Go to your *Inventory Panel* and select the items that you want to assign the tags and groups.
2. Click on the **X items selected** button.
3. Choose the **Add to Tag** from the dropdown menu.
4. In the popup you see, select the tag you want to add to the listings from the dropdown menu.
5. Click on the **Add Tag to Listings** button and this will assign the tags to your chosen listings in bulk.

#### **How to Add Groups in Bulk:**

1. Go to your *Inventory Panel* and select the items that you want to assign the tags and groups.
2. Click on the **X items selected** button.
3. Choose the **Add to Group** from the dropdown menu.
4. In the popup you see, select the group you want to add to the listings from the dropdown menu.
5. Click on the **Add Listings to group** button and this will assign the group to your chosen listings in bulk.

{% embed url="<https://youtu.be/g6fa9SQbqw8>" %}
Add Tags and Groups to Listings in Bulk
{% endembed %}


# How to Import Mercari Listings on Inventory Panel

**Steps:**

1. Navigate to your PrimeLister Inventory Panel Page.&#x20;
2. Click on the "Import Listings" button which is on the right side of the page.&#x20;
3. Click on the "From Facebook” button from the dropdown menu.&#x20;
4. Select the listings that you want to Import.&#x20;
5. Click on the ''Import Listings'' button.&#x20;
6. It will open new tabs in your browser and the task will be operated automatically. Please do not close this tab.


# Cross-list

Learn more about the cross-listing feature. 🤓

## Cross-list on Different Marketplaces 📚

{% content-ref url="/pages/JPOV5uLmKLUumyWGI5Fb" %}
[Poshmark](/features/cross-lister-tool/cross-list/poshmark)
{% endcontent-ref %}

{% content-ref url="/pages/FEBVQFkzFGpvcU2ewSst" %}
[Mercari](/features/cross-lister-tool/cross-list/mercari)
{% endcontent-ref %}

{% content-ref url="/pages/xxHqZmQOPTYTkDrWLCrn" %}
[eBay](/features/cross-lister-tool/cross-list/ebay)
{% endcontent-ref %}

{% content-ref url="/pages/cY8yjXgYrkHO5M2hVs9q" %}
[Facebook Marketplace](/features/cross-lister-tool/cross-list/facebook-marketplace)
{% endcontent-ref %}

{% content-ref url="/pages/uoOaLCz5zkBkLksx64EZ" %}
[Etsy](/features/cross-lister-tool/cross-list/etsy)
{% endcontent-ref %}

{% content-ref url="/pages/uJDahuDJ3pMMu9HnCVSh" %}
[Instagram](/features/cross-lister-tool/cross-list/instagram)
{% endcontent-ref %}

{% content-ref url="/pages/Xv1ilyRBWYBENAhGf1Ii" %}
[Depop](/features/cross-lister-tool/cross-list/depop)
{% endcontent-ref %}

{% content-ref url="/pages/mImkyItVklvTiADWjsn6" %}
[Inventory Panel](/features/cross-lister-tool/cross-list/inventory-panel)
{% endcontent-ref %}


# Poshmark

Learn more about cross-listing from Poshmark. 🤓

## Cross-list from Poshmark to Different Marketplaces 📚

{% content-ref url="/pages/ulkiKSDODtDSuTB1QHua" %}
[How to Cross-list Items from Poshmark to Mercari](/features/cross-lister-tool/cross-list/poshmark/how-to-cross-list-items-from-poshmark-to-mercari)
{% endcontent-ref %}

{% content-ref url="/pages/ak0jcUCcuLku9zkbGjl1" %}
[How to Cross-list Items from Poshmark to eBay](/features/cross-lister-tool/cross-list/poshmark/how-to-cross-list-items-from-poshmark-to-ebay)
{% endcontent-ref %}

{% content-ref url="/pages/9a0siIqb5FwEzcDZbIq5" %}
[How to Cross-list Items from Poshmark to Facebook Marketplace](/features/cross-lister-tool/cross-list/poshmark/how-to-cross-list-items-from-poshmark-to-facebook-marketplace)
{% endcontent-ref %}

{% content-ref url="/pages/8pWKj0o5ujBJI1eUOvt9" %}
[How to Cross-list Items from Poshmark to Etsy](/features/cross-lister-tool/cross-list/poshmark/how-to-cross-list-items-from-poshmark-to-etsy)
{% endcontent-ref %}

{% content-ref url="/pages/LIJLuWxWWpZ8retBK4qO" %}
[How to Cross-list Items from Poshmark to Instagram](/features/cross-lister-tool/cross-list/poshmark/how-to-cross-list-items-from-poshmark-to-instagram)
{% endcontent-ref %}

{% content-ref url="/pages/cvpV5LgCoWX6i77GgpSe" %}
[How to Cross-list Items from Poshmark to Depop](/features/cross-lister-tool/cross-list/poshmark/how-to-cross-list-items-from-poshmark-to-depop)
{% endcontent-ref %}


# How to Cross-list Items from Poshmark to Mercari

{% embed url="<https://youtu.be/JlinizxG-Ys>" %}

**Steps:**

1. Navigate to your Poshmark closet Page.&#x20;
2. Select the listings that you want to crosslist to Mercari.&#x20;
3. Click on the "Slide bar" button which is on the right corner of your screen.&#x20;
4. Click on the "Crosslist" button from the dropdown menu.&#x20;
5. Click on the ''Mercari'' button.&#x20;
6. It will open a new tab in your browser and the task will be operated automatically. Do not close this tab.&#x20;
7. You will need to fill the blank fields if there is any after PrimeLister finishes filling the Title, Description, Price, and uploading the images. You can list your product just after filling in the required fields.&#x20;
8. Review each listing and publish.


# How to Cross-list Items from Poshmark to eBay

**Steps**:

1. Navigate to your Poshmark closet Page.&#x20;
2. Select the listings that you want to crosslist to Ebay.&#x20;
3. Click on the "Slide bar" button which is on the right corner of your screen.&#x20;
4. Click on the "Crosslist" button from the dropdown menu.&#x20;
5. Click on the ''Ebay'' button.&#x20;
6. It will open a new tab in your browser and the task will be operated automatically. Do not close this tab.&#x20;
7. You will need to fill the blank fields if there is any after PrimeLister finishes filling the Title, Description, Price, and uploading the images. You can list your product just after filling in the required fields.&#x20;
8. Review each listing and publish.


# How to Cross-list Items from Poshmark to Facebook Marketplace

**Steps**:

1. Navigate to your Poshmark closet Page.&#x20;
2. Select the listings that you want to crosslist to Facebook Marketplace.&#x20;
3. Click on the "Slide bar" button which is on the right corner of your screen.&#x20;
4. Click on the "Crosslist" button from the dropdown menu.&#x20;
5. Click on the ''Facebook'' button.&#x20;
6. It will open a new tab in your browser and the task will be operated automatically. Do not close this tab.&#x20;
7. You will need to fill the blank fields if there is any after PrimeLister finishes filling the Title, Description, Price, and uploading the images. You can list your product just after filling in the required fields.&#x20;
8. Review each listing and publish.


# How to Cross-list Items from Poshmark to Etsy

{% embed url="<https://youtu.be/yFJ9Xe-XDqY>" %}

**Steps**:

1. Navigate to your Poshmark closet Page.&#x20;
2. Select the listings that you want to crosslist to Etsy.&#x20;
3. Click on the "Slide bar" button which is on the right corner of your screen.&#x20;
4. Click on the "Crosslist" button from the dropdown menu.&#x20;
5. Click on the ''Etsy'' button.&#x20;
6. It will open a new tab in your browser and the task will be operated automatically. Do not close this tab.&#x20;
7. You will need to fill the blank fields if there is any after PrimeLister finishes filling the Title, Description, Price, and uploading the images. You can list your product just after filling in the required fields.&#x20;
8. Review each listing and publish.


# How to Cross-list Items from Poshmark to Instagram

{% embed url="<https://youtu.be/OsDsP6hlHmw>" %}

**Steps:**

1. Navigate to your Poshmark closet Page.&#x20;
2. Select the listings that you want to crosslist to Instagram.&#x20;
3. Click on the "Slide bar" button which is on the right corner of your screen.&#x20;
4. Click on the "Crosslist" button from the dropdown menu.&#x20;
5. Click on the ''Instagram'' button.&#x20;
6. It will open a new tab in your browser and the task will be operated automatically. Do not close this tab.&#x20;
7. You will need to fill the blank fields if there is any after PrimeLister finishes filling the Title, Description, Price, and uploading the images. You can list your product just after filling in the required fields.&#x20;
8. Review each listing and publish


# How to Cross-list Items from Poshmark to Depop

{% embed url="<https://youtu.be/gvmQ8rfQOEs>" %}

**Steps:**

1. Navigate to your Poshmark closet Page.&#x20;
2. Select the listings that you want to crosslist to Depop.&#x20;
3. Click on the "Slide bar" button which is on the right corner of your screen.&#x20;
4. Click on the "Crosslist" button from the dropdown menu.&#x20;
5. Click on the ''Depop'' button.&#x20;
6. It will open a new tab in your browser and the task will be operated automatically. Do not close this tab.&#x20;
7. You will need to fill the blank fields if there is any after PrimeLister finishes filling the Title, Description, Price, and uploading the images. You can list your product just after filling in the required fields.&#x20;
8. Review each listing and publish.


# Mercari

Learn more about cross-listing from Mercari. 🤓

## Cross-list from Mercari to Different Marketplaces 📚

{% content-ref url="/pages/NiM6QN7b6q3wHGNWcmkU" %}
[How to Cross-list Items from Mercari to Poshmark](/features/cross-lister-tool/cross-list/mercari/how-to-crosslist-from-mercari-to-poshmark)
{% endcontent-ref %}

{% content-ref url="/pages/1nY96XtKYlKY1wW7qb09" %}
[How to Cross-list Items from Mercari to eBay](/features/cross-lister-tool/cross-list/mercari/how-to-crosslist-from-mercari-to-ebay)
{% endcontent-ref %}

{% content-ref url="/pages/7cIDcLnpgLvcgurCkIIE" %}
[How to Cross-list Items from Mercari to Facebook Marketplace](/features/cross-lister-tool/cross-list/mercari/how-to-crosslist-from-mercari-to-facebook-marketplace)
{% endcontent-ref %}

{% content-ref url="/pages/4jA2P0c6MX6ZY7eIWR9a" %}
[How to Cross-list Items from Mercari to Etsy](/features/cross-lister-tool/cross-list/mercari/how-to-crosslist-from-mercari-to-etsy)
{% endcontent-ref %}

{% content-ref url="/pages/wWbugW90nUIs24PplC6d" %}
[How to Cross-list Items from Mercari to Instagram](/features/cross-lister-tool/cross-list/mercari/how-to-crosslist-from-mercari-to-instagram)
{% endcontent-ref %}

{% content-ref url="/pages/Q7fpCTYDNB9iBYYKDLmH" %}
[How to Cross-list Items from Mercari to Depop](/features/cross-lister-tool/cross-list/mercari/how-to-crosslist-from-mercari-to-depop)
{% endcontent-ref %}


# How to Cross-list Items from Mercari to Poshmark

{% embed url="<https://youtu.be/SYmVddobPTA>" %}

**Steps:**

1. Navigate to your listings page on Mercari.&#x20;
2. Select the listings that you want to cross-list to Poshmark.&#x20;
3. Click on the "Slide bar" button which is on the right corner of your screen.&#x20;
4. Click on the "Cross-list" button from the dropdown menu.&#x20;
5. Click on the ''Poshmark'' button.&#x20;
6. It will open a new tab in your browser and the task will be operated automatically. Do not close this tab.&#x20;
7. You will need to fill the blank fields if there is any after PrimeLister finishes filling the Title, Description, Price, and uploading the images. You can list your product just after filling in the required fields.&#x20;
8. When you list your product, PrimeLister imports it to your inventory automatically so you do not need to do any additional operations manually.&#x20;
9. Review each listing and publish.


# How to Cross-list Items from Mercari to eBay

{% embed url="<https://youtu.be/05p2PTeoIx4>" %}

**Steps:**

1. Navigate to your Mercari store Page.&#x20;
2. Select the listings that you want to crosslist to Ebay.&#x20;
3. Click on the "Slide bar" button which is on the right corner of your screen.&#x20;
4. Click on the "Crosslist" button from the dropdown menu.&#x20;
5. Click on the ''Ebay'' button.&#x20;
6. It will open a new tab in your browser and the task will be operated automatically. Do not close this tab.&#x20;
7. You will need to fill the blank fields if there is any after PrimeLister finishes filling the Title, Description, Price, and uploading the images. You can list your product just after filling in the required fields.&#x20;
8. Review each listing and publish.


# How to Cross-list Items from Mercari to Facebook Marketplace

**Steps:**

1. Navigate to your Mercari store Page.&#x20;
2. Select the listings that you want to crosslist to Facebook Marketplace.&#x20;
3. Click on the "Slide bar" button which is on the right corner of your screen.&#x20;
4. Click on the "Crosslist" button from the dropdown menu.&#x20;
5. Click on the ''Facebook'' button.&#x20;
6. It will open a new tab in your browser and the task will be operated automatically. Do not close this tab.&#x20;
7. You will need to fill the blank fields if there is any after PrimeLister finishes filling the Title, Description, Price, and uploading the images. You can list your product just after filling in the required fields.&#x20;
8. Review each listing and publish.


# How to Cross-list Items from Mercari to Etsy

{% embed url="<https://youtu.be/8oDNWy6M48c>" %}

**Steps:**

1. Navigate to your Mercari store Page.&#x20;
2. Select the listings that you want to crosslist to Etsy.&#x20;
3. Click on the "Slide bar" button which is on the right corner of your screen.&#x20;
4. Click on the "Crosslist" button from the dropdown menu.&#x20;
5. Click on the ''Etsy'' button.&#x20;
6. It will open a new tab in your browser and the task will be operated automatically. Do not close this tab.&#x20;
7. You will need to fill the blank fields if there is any after PrimeLister finishes filling the Title, Description, Price, and uploading the images. You can list your product just after filling in the required fields.&#x20;
8. Review each listing and publish.


# How to Cross-list Items from Mercari to Instagram

{% embed url="<https://youtu.be/ndcyl13SAH4>" %}

**Steps**:

1. Navigate to your Mercari store Page.&#x20;
2. Select the listings that you want to crosslist to Instagram.&#x20;
3. Click on the "Slide bar" button which is on the right corner of your screen.&#x20;
4. Click on the "Crosslist" button from the dropdown menu.&#x20;
5. Click on the ''Instagram'' button.&#x20;
6. It will open a new tab in your browser and the task will be operated automatically. Do not close this tab.&#x20;
7. You will need to fill the blank fields if there is any after PrimeLister finishes filling the Title, Description, Price, and uploading the images. You can list your product just after filling in the required fields.&#x20;
8. Review each listing and publish.


# How to Cross-list Items from Mercari to Depop

{% embed url="<https://youtu.be/cCqn22oB1Zk>" %}

**Steps:**

1. Navigate to your Mercari store Page.&#x20;
2. Select the listings that you want to crosslist to Depop.&#x20;
3. Click on the "Slide bar" button which is on the right corner of your screen.&#x20;
4. Click on the "Crosslist" button from the dropdown menu.&#x20;
5. Click on the ''Depop'' button.&#x20;
6. It will open a new tab in your browser and the task will be operated automatically. Do not close this tab.&#x20;
7. You will need to fill the blank fields if there is any after PrimeLister finishes filling the Title, Description, Price, and uploading the images. You can list your product just after filling in the required fields.&#x20;
8. Review each listing and publish.


# eBay

Learn more about cross-listing from eBay. 🤓

## Cross-list from eBay to Different Marketplaces 📚

{% content-ref url="/pages/Jpm7hO6hb6a7qZWm5xvy" %}
[How to Cross-list Items from eBay to Poshmark](/features/cross-lister-tool/cross-list/ebay/how-to-cross-list-items-from-ebay-to-poshmark)
{% endcontent-ref %}

{% content-ref url="/pages/tL5jKgbdaH8pbgDNLrNO" %}
[How to Cross-list Items from eBay to Mercari](/features/cross-lister-tool/cross-list/ebay/how-to-cross-list-items-from-ebay-to-mercari)
{% endcontent-ref %}

{% content-ref url="/pages/jD8FNtJbzOGuDrYWava6" %}
[How to Cross-list Items from eBay to Facebook Marketplace](/features/cross-lister-tool/cross-list/ebay/how-to-cross-list-items-from-ebay-to-facebook-marketplace)
{% endcontent-ref %}

{% content-ref url="/pages/VdW8jePXD0wlotrB4GWk" %}
[How to Cross-list Items from eBay to Etsy](/features/cross-lister-tool/cross-list/ebay/how-to-cross-list-items-from-ebay-to-etsy)
{% endcontent-ref %}

{% content-ref url="/pages/wt8QDr1VCxTtMS1h1VQi" %}
[How to Cross-list Items from eBay to Instagram](/features/cross-lister-tool/cross-list/ebay/how-to-cross-list-items-from-ebay-to-instagram)
{% endcontent-ref %}

{% content-ref url="/pages/fbkG4QWCEnbhKe9PJAZR" %}
[How to Cross-list Items from eBay to Depop](/features/cross-lister-tool/cross-list/ebay/how-to-cross-list-items-from-ebay-to-depop)
{% endcontent-ref %}


# How to Cross-list Items from eBay to Poshmark

{% embed url="<https://youtu.be/Cn0AXQKhjdA>" %}

**Steps:**

1. Navigate to your eBay store Page.&#x20;
2. Select the listings that you want to crosslist to Poshmark.&#x20;
3. Click on the "Slide bar" button which is on the right corner of your screen.&#x20;
4. Click on the "Crosslist" button from the dropdown menu.&#x20;
5. Click on the ''Poshmark'' button.&#x20;
6. It will open a new tab in your browser and the task will be operated automatically. Do not close this tab.&#x20;
7. You will need to fill the blank fields if there is any after PrimeLister finishes filling the Title, Description, Price, and uploading the images. You can list your product just after filling in the required fields.&#x20;
8. Review each listing and publish.


# How to Cross-list Items from eBay to Mercari

{% embed url="<https://youtu.be/w3zS2_ZqAjs>" %}

**Steps:**

1. Navigate to your eBay store Page.&#x20;
2. Select the listings that you want to crosslist to Mercari.&#x20;
3. Click on the "Slide bar" button which is on the right corner of your screen.&#x20;
4. Click on the "Crosslist" button from the dropdown menu.&#x20;
5. Click on the ''Mercari'' button.&#x20;
6. It will open a new tab in your browser and the task will be operated automatically. Do not close this tab.&#x20;
7. You will need to fill the blank fields if there is any after PrimeLister finishes filling the Title, Description, Price, and uploading the images. You can list your product just after filling in the required fields.&#x20;
8. Review each listing and publish.


# How to Cross-list Items from eBay to Facebook Marketplace

**Steps:**

1. Navigate to your eBay store Page.&#x20;
2. Select the listings that you want to crosslist to Facebook Marketplace.&#x20;
3. Click on the "Slide bar" button which is on the right corner of your screen.&#x20;
4. Click on the "Crosslist" button from the dropdown menu.&#x20;
5. Click on the ''Facebook'' button.&#x20;
6. It will open a new tab in your browser and the task will be operated automatically. Do not close this tab.&#x20;
7. You will need to fill the blank fields if there is any after PrimeLister finishes filling the Title, Description, Price, and uploading the images. You can list your product just after filling in the required fields.&#x20;
8. Review each listing and publish.


# How to Cross-list Items from eBay to Etsy

{% embed url="<https://youtu.be/zdBmd99W75Q>" %}

**Steps:**

1. Navigate to your eBay store Page.&#x20;
2. Select the listings that you want to crosslist to Etsy.&#x20;
3. Click on the "Slide bar" button which is on the right corner of your screen.&#x20;
4. Click on the "Crosslist" button from the dropdown menu.&#x20;
5. Click on the ''Etsy'' button.&#x20;
6. It will open a new tab in your browser and the task will be operated automatically. Do not close this tab.&#x20;
7. You will need to fill the blank fields if there is any after PrimeLister finishes filling the Title, Description, Price, and uploading the images. You can list your product just after filling in the required fields.&#x20;
8. Review each listing and publish.


# How to Cross-list Items from eBay to Instagram

{% embed url="<https://youtu.be/6cqiY9GUvCg>" %}

**Steps**:

1. Navigate to your eBay store Page.&#x20;
2. Select the listings that you want to crosslist to Instagram.&#x20;
3. Click on the "Slide bar" button which is on the right corner of your screen.&#x20;
4. Click on the "Crosslist" button from the dropdown menu.&#x20;
5. Click on the ''Instagram'' button.&#x20;
6. It will open a new tab in your browser and the task will be operated automatically. Do not close this tab.&#x20;
7. You will need to fill the blank fields if there is any after PrimeLister finishes filling the Title, Description, Price, and uploading the images. You can list your product just after filling in the required fields.&#x20;
8. Review each listing and publish.


# How to Cross-list Items from eBay to Depop

{% embed url="<https://youtu.be/FZbHzadwMPs>" %}

**Steps:**

1. Navigate to your eBay store Page.&#x20;
2. Select the listings that you want to crosslist to Depop.&#x20;
3. Click on the "Slide bar" button which is on the right corner of your screen.&#x20;
4. Click on the "Crosslist" button from the dropdown menu.&#x20;
5. Click on the ''Depop'' button.&#x20;
6. It will open a new tab in your browser and the task will be operated automatically. Do not close this tab.&#x20;
7. You will need to fill the blank fields if there is any after PrimeLister finishes filling the Title, Description, Price, and uploading the images. You can list your product just after filling in the required fields.&#x20;
8. Review each listing and publish.


# How to Keep Current Listing ID on eBay

The products are automatically relisted on eBay, and the relisted products' listings IDs are updated. Your Primelister Inventory changes when the ID changes. It is possible to relist the same product on eBay with the same ID.

Use Sell Similar when relisting the item. The listing Duration should be changed to GTC (Good til Cancelled). As a result, until you finish the listing, it will keep the same item id number.

In this way, items will have a new item id. There is no way to reuse the previous item id number, so you'll have to update the numbers/links in the other listings to match the new one, but the number will not change once it's set to GTC.

**Link:** <https://www.ebay.com/help/selling/listings/selecting-listing-duration?id=4652>


# How to Switch to Business Tool on eBay For Using The New Listing Tool

To cross-list your items to eBay with the PrimeLister Extension, make sure you are using the business tool and have access to the new listing tool on eBay.

To switch to the business tool while listing an item in the current version of your listing tool, follow these steps:

1. Look for the "Switch to business tool" button at the top right of your screen.
2. Click on the "Switch to business tool" button.
3. A popup will appear asking you to confirm the switch to the business tool.
4. Click on the "Switch" button on the popup.
5. Once you have successfully switched to the business tool, you can use the PrimeLister extension to cross-list your items from other platforms to eBay.

### Switch to Business Tool As Shown Below

<figure><img src="https://2694965679-files.gitbook.io/~/files/v0/b/gitbook-x-prod.appspot.com/o/spaces%2FG6RIJU8HpzCXLZBS9jJ6%2Fuploads%2FmnsH1AHRgRWEHK8mJmZs%2Febay-switch-to-business-tool.png?alt=media&amp;token=b9afa848-6b51-48b5-8365-7c694b8b82d8" alt=""><figcaption><p>Step 1: Switch to business tool</p></figcaption></figure>

<figure><img src="https://2694965679-files.gitbook.io/~/files/v0/b/gitbook-x-prod.appspot.com/o/spaces%2FG6RIJU8HpzCXLZBS9jJ6%2Fuploads%2Fr8fkYyzh9m2qaIRllQgj%2Febay-welcome-to-new-listing-tool.png?alt=media&amp;token=d3643863-0e28-437f-980b-2a83591330d2" alt=""><figcaption><p>Step 2: You can use PrimeLister extension to cross-list to eBay once you switched to business tool and have access to new listing tool</p></figcaption></figure>

{% hint style="info" %}
The main point to note is that, at present, only sellers using the Seller Hub have access to the new listing tool on eBay. However, all eBay sellers will be given access to it in the future.

\
Read the official article by eBay to learn more about using the new listing tool:

📚 [Using the new listing tool](https://www.ebay.com/help/selling/listings/listing-tips/using-new-listing-tool?id=5196)
{% endhint %}


# Facebook Marketplace

Learn more about cross-listing from Facebook Marketplace. 🤓

## Cross-list from Facebook Marketplace to Different Marketplaces 📚

{% content-ref url="/pages/yH5OrZZicP3nzVkFw9rx" %}
[How to Cross-list Items from Facebook Marketplace to Poshmark](/features/cross-lister-tool/cross-list/facebook-marketplace/how-to-cross-list-items-from-facebook-marketplace-to-poshmark)
{% endcontent-ref %}

{% content-ref url="/pages/xsoRBV0RFqnPoU1klXqQ" %}
[How to Cross-list Items from Facebook Marketplace to Mercari](/features/cross-lister-tool/cross-list/facebook-marketplace/how-to-cross-list-items-from-facebook-marketplace-to-mercari)
{% endcontent-ref %}

{% content-ref url="/pages/T5WoyqRkLzTFlRWsjujj" %}
[How to Cross-list Items from Facebook Marketplace to eBay](/features/cross-lister-tool/cross-list/facebook-marketplace/how-to-cross-list-items-from-facebook-marketplace-to-ebay)
{% endcontent-ref %}

{% content-ref url="/pages/kSX0BubJI2HnTeT7s5wq" %}
[How to Cross-list Items from Facebook Marketplace to Etsy](/features/cross-lister-tool/cross-list/facebook-marketplace/how-to-cross-list-items-from-facebook-marketplace-to-etsy)
{% endcontent-ref %}

{% content-ref url="/pages/1vWSBrxkbGYeYY9sFpeU" %}
[How to Cross-list Items from Facebook Marketplace to Instagram](/features/cross-lister-tool/cross-list/facebook-marketplace/how-to-cross-list-items-from-facebook-marketplace-to-instagram)
{% endcontent-ref %}

{% content-ref url="/pages/ojbYwvX9hmBHCsBxjcw1" %}
[How to Cross-list Items from Facebook Marketplace to Depop](/features/cross-lister-tool/cross-list/facebook-marketplace/how-to-cross-list-items-from-facebook-marketplace-to-depop)
{% endcontent-ref %}


# How to Cross-list Items from Facebook Marketplace to Poshmark

{% embed url="<https://youtu.be/4O-oUW6hFU4>" %}

**Steps:**

1. Navigate to your Facebook Marketplace store Page.&#x20;
2. Select the listings that you want to crosslist to Poshmark.&#x20;
3. Click on the "Slide bar" button which is on the right corner of your screen.&#x20;
4. Click on the "Crosslist" button from the dropdown menu.&#x20;
5. Click on the ''Poshmark'' button.&#x20;
6. It will open a new tab in your browser and the task will be operated automatically. Do not close this tab.&#x20;
7. You will need to fill the blank fields if there is any after PrimeLister finishes filling the Title, Description, Price, and uploading the images. You can list your product just after filling in the required fields.&#x20;
8. Review each listing and publish.


# How to Cross-list Items from Facebook Marketplace to Mercari

{% embed url="<https://youtu.be/OH6f10aMj64>" %}

**Steps:**

1. Navigate to your Facebook Marketplace store Page.&#x20;
2. Select the listings that you want to crosslist to Mercari.&#x20;
3. Click on the "Slide bar" button which is on the right corner of your screen.&#x20;
4. Click on the "Crosslist" button from the dropdown menu.&#x20;
5. Click on the ''Mercari'' button.&#x20;
6. It will open a new tab in your browser and the task will be operated automatically. Do not close this tab.&#x20;
7. You will need to fill the blank fields if there is any after PrimeLister finishes filling the Title, Description, Price, and uploading the images. You can list your product just after filling in the required fields.&#x20;
8. Review each listing and publish.


# How to Cross-list Items from Facebook Marketplace to eBay

**Steps:**

1. Navigate to your Facebook Marketplace store Page.&#x20;
2. Select the listings that you want to crosslist to Ebay.&#x20;
3. Click on the "Slide bar" button which is on the right corner of your screen.&#x20;
4. Click on the "Crosslist" button from the dropdown menu.&#x20;
5. Click on the ''Ebay'' button.&#x20;
6. It will open a new tab in your browser and the task will be operated automatically. Do not close this tab.&#x20;
7. You will need to fill the blank fields if there is any after PrimeLister finishes filling the Title, Description, Price, and uploading the images. You can list your product just after filling in the required fields.&#x20;
8. Review each listing and publish.


# How to Cross-list Items from Facebook Marketplace to Etsy

{% embed url="<https://youtu.be/XS2goq6PX_Q>" %}

**Steps:**

1. Navigate to your Facebook Marketplace store Page.&#x20;
2. Select the listings that you want to crosslist to Etsy.&#x20;
3. Click on the "Slide bar" button which is on the right corner of your screen.&#x20;
4. Click on the "Crosslist" button from the dropdown menu.&#x20;
5. Click on the ''Etsy'' button.&#x20;
6. It will open a new tab in your browser and the task will be operated automatically. Do not close this tab.
7. You will need to fill the blank fields if there is any after PrimeLister finishes filling the Title, Description, Price, and uploading the images. You can list your product just after filling in the required fields.&#x20;
8. Review each listing and publish.


# How to Cross-list Items from Facebook Marketplace to Instagram

**Steps:**

1. Navigate to your Facebook Marketplace store Page.&#x20;
2. Select the listings that you want to crosslist to Instagram.&#x20;
3. Click on the "Slide bar" button which is on the right corner of your screen.&#x20;
4. Click on the "Crosslist" button from the dropdown menu.&#x20;
5. Click on the ''Instagram'' button.&#x20;
6. It will open a new tab in your browser and the task will be operated automatically. Do not close this tab.&#x20;
7. You will need to fill the blank fields if there is any after PrimeLister finishes filling the Title, Description, Price, and uploading the images. You can list your product just after filling in the required fields.&#x20;
8. Review each listing and publish.


# How to Cross-list Items from Facebook Marketplace to Depop

{% embed url="<https://youtu.be/It1b2jFLuqE>" %}

**Steps:**

1. Navigate to your Facebook Marketplace store Page.&#x20;
2. Select the listings that you want to crosslist to Depop.&#x20;
3. Click on the "Slide bar" button which is on the right corner of your screen.&#x20;
4. Click on the "Crosslist" button from the dropdown menu.&#x20;
5. Click on the ''Depop'' button.&#x20;
6. It will open a new tab in your browser and the task will be operated automatically. Do not close this tab.&#x20;
7. You will need to fill the blank fields if there is any after PrimeLister finishes filling the Title, Description, Price, and uploading the images. You can list your product just after filling in the required fields.&#x20;
8. Review each listing and publish.


# Etsy

Learn more about cross-listing from Etsy. 🤓

## Cross-list from Etsy to Different Marketplaces 📚

{% content-ref url="/pages/0AYgcEH1OxRYJ1E0ssGU" %}
[How to Cross-list Items from Etsy to Poshmark](/features/cross-lister-tool/cross-list/etsy/how-to-cross-list-items-from-etsy-to-poshmark)
{% endcontent-ref %}

{% content-ref url="/pages/sgUteNyZPyBFAa6B6WBG" %}
[How to Cross-list Items from Etsy to Mercari](/features/cross-lister-tool/cross-list/etsy/how-to-cross-list-items-from-etsy-to-mercari)
{% endcontent-ref %}

{% content-ref url="/pages/KUMO24ry8ZLafxHcnlpv" %}
[How to Cross-list Items from Etsy to eBay](/features/cross-lister-tool/cross-list/etsy/how-to-cross-list-items-from-etsy-to-ebay)
{% endcontent-ref %}

{% content-ref url="/pages/09pEfNIS9mM8hdyt4zZS" %}
[How to Cross-list Items from Etsy to Facebook Marketplace](/features/cross-lister-tool/cross-list/etsy/how-to-cross-list-items-from-etsy-to-facebook-marketplace)
{% endcontent-ref %}

{% content-ref url="/pages/M947mXz4T6UPalrIzIkw" %}
[How to Cross-list Items from Etsy to Instagram](/features/cross-lister-tool/cross-list/etsy/how-to-cross-list-items-from-etsy-to-instagram)
{% endcontent-ref %}

{% content-ref url="/pages/voZDio2jPYmVXXMQRQFh" %}
[How to Cross-list Items from Etsy to Depop](/features/cross-lister-tool/cross-list/etsy/how-to-cross-list-items-from-etsy-to-depop)
{% endcontent-ref %}


# How to Cross-list Items from Etsy to Poshmark

{% embed url="<https://youtu.be/TXVLxMBcyk0>" %}

**Steps:**

1. Navigate to your Etsy store Page.&#x20;
2. Select the listings that you want to crosslist to Poshmark.&#x20;
3. Click on the "Slide bar" button which is on the right corner of your screen.&#x20;
4. Click on the "Crosslist" button from the dropdown menu.&#x20;
5. Click on the ''Poshmark'' button.&#x20;
6. It will open a new tab in your browser and the task will be operated automatically. Do not close this tab.&#x20;
7. You will need to fill the blank fields if there is any after PrimeLister finishes filling the Title, Description, Price, and uploading the images. You can list your product just after filling in the required fields.&#x20;
8. Review each listing and publish.


# How to Cross-list Items from Etsy to Mercari

{% embed url="<https://youtu.be/uy4R4VQdXBI>" %}

**Steps:**

1. Navigate to your Etsy store Page.&#x20;
2. Select the listings that you want to crosslist to Mercari.&#x20;
3. Click on the "Slide bar" button which is on the right corner of your screen.&#x20;
4. Click on the "Crosslist" button from the dropdown menu.&#x20;
5. Click on the ''Mercari'' button.&#x20;
6. It will open a new tab in your browser and the task will be operated automatically. Do not close this tab.&#x20;
7. You will need to fill the blank fields if there is any after PrimeLister finishes filling the Title, Description, Price, and uploading the images. You can list your product just after filling in the required fields.&#x20;
8. Review each listing and publish.


# How to Cross-list Items from Etsy to eBay

{% embed url="<https://youtu.be/222NJ2RTQ8Y>" %}

**Steps:**

1. Navigate to your Etsy store page.&#x20;
2. Select the listings that you want to crosslist to Ebay.&#x20;
3. Click on the "Slide bar" button which is on the right corner of your screen.&#x20;
4. Click on the "Crosslist" button from the dropdown menu.&#x20;
5. Click on the ''Ebay'' button.&#x20;
6. It will open a new tab in your browser and the task will be operated automatically. Do not close this tab.&#x20;
7. You will need to fill the blank fields if there is any after PrimeLister finishes filling the Title, Description, Price, and uploading the images. You can list your product just after filling in the required fields.&#x20;
8. Review each listing and publish.


# How to Cross-list Items from Etsy to Facebook Marketplace

**Steps:**

1. Navigate to your Etsy store Page.&#x20;
2. Select the listings that you want to crosslist to Facebook Marketplace.&#x20;
3. Click on the "Slide bar" button which is on the right corner of your screen.&#x20;
4. Click on the "Crosslist" button from the dropdown menu.&#x20;
5. Click on the ''Facebook'' button.&#x20;
6. It will open a new tab in your browser and the task will be operated automatically. Do not close this tab.&#x20;
7. You will need to fill the blank fields if there is any after PrimeLister finishes filling the Title, Description, Price, and uploading the images. You can list your product just after filling in the required fields.&#x20;
8. Review each listing and publish.


# How to Cross-list Items from Etsy to Instagram

{% embed url="<https://youtu.be/8O0B8beF_tU>" %}

**Steps:**

1. Navigate to your Etsy store Page.&#x20;
2. Select the listings that you want to crosslist to Instagram.&#x20;
3. Click on the "Slide bar" button which is on the right corner of your screen.&#x20;
4. Click on the "Crosslist" button from the dropdown menu.&#x20;
5. Click on the ''Instagram'' button.&#x20;
6. It will open a new tab in your browser and the task will be operated automatically. Do not close this tab.&#x20;
7. You will need to fill the blank fields if there is any after PrimeLister finishes filling the Title, Description, Price, and uploading the images. You can list your product just after filling in the required fields.&#x20;
8. Review each listing and publish.


# How to Cross-list Items from Etsy to Depop

{% embed url="<https://youtu.be/e-oKz3Uy65g>" %}

**Steps:**

1. Navigate to your Etsy store Page.&#x20;
2. Select the listings that you want to crosslist to Depop.&#x20;
3. Click on the "Slide bar" button which is on the right corner of your screen.&#x20;
4. Click on the "Crosslist" button from the dropdown menu.&#x20;
5. Click on the ''Depop'' button.
6. It will open a new tab in your browser and the task will be operated automatically. Do not close this tab.&#x20;
7. You will need to fill the blank fields if there is any after PrimeLister finishes filling the Title, Description, Price, and uploading the images. You can list your product just after filling in the required fields.&#x20;
8. Review each listing and publish.


# Instagram

Learn more about cross-listing from Instagram. 🤓

## Cross-list from Instagram to Different Marketplaces 📚

{% content-ref url="/pages/Q4GTmDuhOMmF3jCYJC0T" %}
[How to Cross-list Items from Instagram to Poshmark](/features/cross-lister-tool/cross-list/instagram/how-to-cross-list-items-from-instagram-to-poshmark)
{% endcontent-ref %}

{% content-ref url="/pages/2fg1Qac8i2SNX2YeAZIO" %}
[How to Cross-list Items from Instagram to Mercari](/features/cross-lister-tool/cross-list/instagram/how-to-cross-list-items-from-instagram-to-mercari)
{% endcontent-ref %}

{% content-ref url="/pages/oG4W4eO4XRw18qPWAMiP" %}
[How to Cross-list Items from Instagram to eBay](/features/cross-lister-tool/cross-list/instagram/how-to-cross-list-items-from-instagram-to-ebay)
{% endcontent-ref %}

{% content-ref url="/pages/71URHtEFFfo0gXN1sUaf" %}
[How to Cross-list Items from Instagram to Facebook Marketplace](/features/cross-lister-tool/cross-list/instagram/how-to-cross-list-items-from-instagram-to-facebook-marketplace)
{% endcontent-ref %}

{% content-ref url="/pages/XBlzQ2MqVA7lsup9jDN2" %}
[How to Cross-list Items from Instagram to Etsy](/features/cross-lister-tool/cross-list/instagram/how-to-cross-list-items-from-instagram-to-etsy)
{% endcontent-ref %}

{% content-ref url="/pages/xog1MJGDVkAjbFGecDdm" %}
[How to Cross-list Items from Instagram to Depop](/features/cross-lister-tool/cross-list/instagram/how-to-cross-list-items-from-instagram-to-depop)
{% endcontent-ref %}


# How to Cross-list Items from Instagram to Poshmark

**Steps:**

1. Navigate to your Instagram store Page.&#x20;
2. Select the listings that you want to crosslist to Poshmark.&#x20;
3. Click on the "Slide bar" button which is on the right corner of your screen.&#x20;
4. Click on the "Crosslist" button from the dropdown menu.&#x20;
5. Click on the ''Poshmark'' button.&#x20;
6. It will open a new tab in your browser and the task will be operated automatically. Do not close this tab.&#x20;
7. You will need to fill the blank fields if there is any after PrimeLister finishes filling the Title, Description, Price, and uploading the images. You can list your product just after filling in the required fields.&#x20;
8. Review each listing and publish.


# How to Cross-list Items from Instagram to Mercari

**Steps:**

1. Navigate to your Instagram store Page.&#x20;
2. Select the listings that you want to crosslist to Mercari.&#x20;
3. Click on the "Slide bar" button which is on the right corner of your screen.&#x20;
4. Click on the "Crosslist" button from the dropdown menu.&#x20;
5. Click on the ''Mercari'' button.&#x20;
6. It will open a new tab in your browser and the task will be operated automatically. Do not close this tab.&#x20;
7. You will need to fill the blank fields if there is any after PrimeLister finishes filling the Title, Description, Price, and uploading the images. You can list your product just after filling in the required fields.&#x20;
8. Review each listing and publish.


# How to Cross-list Items from Instagram to eBay

**Steps:**

1. Navigate to your Instagram store Page.&#x20;
2. Select the listings that you want to cross-list to eBay.&#x20;
3. Click on the "Slide bar" button which is on the right corner of your screen.&#x20;
4. Click on the "Crosslist" button from the dropdown menu.&#x20;
5. Click on the ''Ebay'' button.&#x20;
6. It will open a new tab in your browser and the task will be operated automatically. Do not close this tab.&#x20;
7. You will need to fill the blank fields if there is any after PrimeLister finishes filling the Title, Description, Price, and uploading the images. You can list your product just after filling in the required fields.&#x20;
8. Review each listing and publish.


# How to Cross-list Items from Instagram to Facebook Marketplace

**Steps:**

1. Navigate to your Instagram store Page.&#x20;
2. Select the listings that you want to crosslist to Facebook Marketplace.&#x20;
3. Click on the "Slide bar" button which is on the right corner of your screen.&#x20;
4. Click on the "Crosslist" button from the dropdown menu.&#x20;
5. Click on the ''Facebook'' button.&#x20;
6. It will open a new tab in your browser and the task will be operated automatically. Do not close this tab.&#x20;
7. You will need to fill the blank fields if there is any after PrimeLister finishes filling the Title, Description, Price, and uploading the images. You can list your product just after filling in the required fields.&#x20;
8. Review each listing and publish.


# How to Cross-list Items from Instagram to Etsy

**Steps:**

1. Navigate to your Instagram store Page.
2. Select the listings that you want to cross-list to Etsy.&#x20;
3. Click on the "Slide bar" button which is on the right corner of your screen.&#x20;
4. Click on the "Crosslist" button from the dropdown menu.&#x20;
5. Click on the ''Etsy'' button.&#x20;
6. It will open a new tab in your browser and the task will be operated automatically. Do not close this tab.&#x20;
7. You will need to fill the blank fields if there is any after PrimeLister finishes filling the Title, Description, Price, and uploading the images. You can list your product just after filling in the required fields.&#x20;
8. Review each listing and publish.


# How to Cross-list Items from Instagram to Depop

**Steps:**

1. Navigate to your Instagram store Page.&#x20;
2. Select the listings that you want to crosslist to Depop.&#x20;
3. Click on the "Slide bar" button which is on the right corner of your screen.&#x20;
4. Click on the "Crosslist" button from the dropdown menu.&#x20;
5. Click on the ''Depop'' button.
6. It will open a new tab in your browser and the task will be operated automatically. Do not close this tab.&#x20;
7. You will need to fill the blank fields if there is any after PrimeLister finishes filling the Title, Description, Price, and uploading the images. You can list your product just after filling in the required fields.&#x20;
8. Review each listing and publish.


# Depop

Learn more about cross-listing from Depop. 🤓

## Cross-list from Depop to Different Marketplaces 📚

{% content-ref url="/pages/XdNm1AVS8Q6j45MRMxAH" %}
[How to Cross-list Items from Depop to Poshmark](/features/cross-lister-tool/cross-list/depop/how-to-cross-list-items-from-depop-to-poshmark)
{% endcontent-ref %}

{% content-ref url="/pages/4PiV96oJJroIhDhxPMge" %}
[How to Cross-list Items from Depop to Mercari](/features/cross-lister-tool/cross-list/depop/how-to-cross-list-items-from-depop-to-mercari)
{% endcontent-ref %}

{% content-ref url="/pages/ZvHvH6BhkVSoMDNUnzPS" %}
[How to Cross-list Items from Depop to eBay](/features/cross-lister-tool/cross-list/depop/how-to-cross-list-items-from-depop-to-ebay)
{% endcontent-ref %}

{% content-ref url="/pages/P6opupM06bLxPGe6I51f" %}
[How to Cross-list Items from Depop to Facebook Marketplace](/features/cross-lister-tool/cross-list/depop/how-to-cross-list-items-from-depop-to-facebook-marketplace)
{% endcontent-ref %}

{% content-ref url="/pages/ihnReQHFkW8FuDd9xnyY" %}
[How to Cross-list Items from Depop to Etsy](/features/cross-lister-tool/cross-list/depop/how-to-cross-list-items-from-depop-to-etsy)
{% endcontent-ref %}

{% content-ref url="/pages/2f16vZNsW9B9rX4eASo5" %}
[How to Cross-list Items from Depop to Instagram](/features/cross-lister-tool/cross-list/depop/how-to-cross-list-items-from-depop-to-instagram)
{% endcontent-ref %}


# How to Cross-list Items from Depop to Poshmark

{% embed url="<https://youtu.be/s87zK8LpeFo>" %}

**Steps:**

1. Navigate to your Depop store Page.&#x20;
2. Select the listings that you want to crosslist to Poshmark.&#x20;
3. Click on the "Slide bar" button which is on the right corner of your screen.&#x20;
4. Click on the "Crosslist" button from the dropdown menu.&#x20;
5. Click on the ''Poshmark'' button.&#x20;
6. It will open a new tab in your browser and the task will be operated automatically. Do not close this tab.&#x20;
7. You will need to fill the blank fields if there is any after PrimeLister finishes filling the Title, Description, Price, and uploading the images. You can list your product just after filling in the required fields.&#x20;
8. Review each listing and publish.


# How to Cross-list Items from Depop to Mercari

{% embed url="<https://youtu.be/DgYEtXZpU2s>" %}

**Steps:**

1. Navigate to your Depop store Page.&#x20;
2. Select the listings that you want to crosslist to Mercari.&#x20;
3. Click on the "Slide bar" button which is on the right corner of your screen.&#x20;
4. Click on the "Crosslist" button from the dropdown menu.&#x20;
5. Click on the ''Mercari'' button.&#x20;
6. It will open a new tab in your browser and the task will be operated automatically. Do not close this tab.&#x20;
7. You will need to fill the blank fields if there is any after PrimeLister finishes filling the Title, Description, Price, and uploading the images. You can list your product just after filling in the required fields.&#x20;
8. Review each listing and publish.


# How to Cross-list Items from Depop to eBay

{% embed url="<https://youtu.be/yr9JT5nybIM>" %}

**Steps:**

1. Navigate to your Depop store Page.&#x20;
2. Select the listings that you want to crosslist to eBay.&#x20;
3. Click on the "Slide bar" button which is on the right corner of your screen.&#x20;
4. Click on the "Crosslist" button from the dropdown menu.&#x20;
5. Click on the ''Ebay'' button.&#x20;
6. It will open a new tab in your browser and the task will be operated automatically. Do not close this tab.&#x20;
7. You will need to fill the blank fields if there is any after PrimeLister finishes filling the Title, Description, Price, and uploading the images. You can list your product just after filling in the required fields.&#x20;
8. Review each listing and publish.


# How to Cross-list Items from Depop to Facebook Marketplace

{% embed url="<https://youtu.be/ZinvG8_I0ys>" %}

**Steps:**

1. Navigate to your Depop store Page.&#x20;
2. Select the listings that you want to crosslist to Facebook Marketplace.&#x20;
3. Click on the "Slide bar" button which is on the right corner of your screen.&#x20;
4. Click on the "Crosslist" button from the dropdown menu.&#x20;
5. Click on the ''Facebook'' button.&#x20;
6. It will open a new tab in your browser and the task will be operated automatically. Do not close this tab.&#x20;
7. You will need to fill the blank fields if there is any after PrimeLister finishes filling the Title, Description, Price, and uploading the images. You can list your product just after filling in the required fields.&#x20;
8. Review each listing and publish


# How to Cross-list Items from Depop to Etsy

{% embed url="<https://youtu.be/_Y4Z12Sz9uA>" %}

**Steps:**

1. Navigate to your Depop store Page.&#x20;
2. Select the listings that you want to crosslist to Etsy.&#x20;
3. Click on the "Slide bar" button which is on the right corner of your screen.&#x20;
4. Click on the "Crosslist" button from the dropdown menu.&#x20;
5. Click on the ''Etsy'' button.&#x20;
6. It will open a new tab in your browser and the task will be operated automatically. Do not close this tab.&#x20;
7. You will need to fill the blank fields if there is any after PrimeLister finishes filling the Title, Description, Price, and uploading the images. You can list your product just after filling in the required fields.&#x20;
8. Review each listing and publish.


# How to Cross-list Items from Depop to Instagram

{% embed url="<https://youtu.be/BAGiP5nykOI>" %}

**Steps:**

1. Navigate to your Depop store Page.&#x20;
2. Select the listings that you want to crosslist to Instagram.&#x20;
3. Click on the "Slide bar" button which is on the right corner of your screen.&#x20;
4. Click on the "Crosslist" button from the dropdown menu.&#x20;
5. Click on the ''Instagram'' button.&#x20;
6. It will open a new tab in your browser and the task will be operated automatically. Do not close this tab.&#x20;
7. You will need to fill the blank fields if there is any after PrimeLister finishes filling the Title, Description, Price, and uploading the images. You can list your product just after filling in the required fields.&#x20;
8. Review each listing and publish.


# Inventory Panel

Learn more about cross-listing from the inventory panel. 🤓

## Cross-list from Inventory Panel to Different Marketplaces 📚

{% content-ref url="/pages/EDBWAp8oERBVIinPEXp4" %}
[How to Cross-list Items to Poshmark on Inventory Panel](/features/cross-lister-tool/cross-list/inventory-panel/how-to-crosslist-items-to-poshmark-on-inventory-panel)
{% endcontent-ref %}

{% content-ref url="/pages/s7gxciPZe3kg8bA863bh" %}
[How to Cross-list Items to Mercari on Inventory Panel](/features/cross-lister-tool/cross-list/inventory-panel/how-to-crosslist-items-to-mercari-on-inventory-panel)
{% endcontent-ref %}

{% content-ref url="/pages/g2uwl2B88oTiAkc2l8KR" %}
[How to Cross-list Items to Facebook Marketplace on Inventory Panel](/features/cross-lister-tool/cross-list/inventory-panel/how-to-crosslist-items-to-facebook-marketplace-on-inventory-panel)
{% endcontent-ref %}

{% content-ref url="/pages/gNW9PnUW3KXYBQVSgqif" %}
[How to Cross-list Items to Etsy on Inventory Panel](/features/cross-lister-tool/cross-list/inventory-panel/how-to-crosslist-items-to-etsy-on-inventory-panel)
{% endcontent-ref %}


# How to Cross-list Items to Poshmark on Inventory Panel

{% embed url="<https://www.youtube.com/watch?v=1t3APB4LKOM>" %}

**Steps:**

1. Navigate to your PrimeLister Inventory Panel Page.&#x20;
2. Select the listing that you want to cross-list to Poshmark.&#x20;
3. Click on the "Listing Actions" button which is on the right side of the page.&#x20;
4. Click on the "Cross-list" button from the dropdown menu.&#x20;
5. Click on the ''Poshmark'' image button.&#x20;
6. It will open new tabs in your browser and the task will be operated automatically. Please do not close this tab.&#x20;
7. You will need to fill the blank fields if there are any after PrimeLister.&#x20;
8. Review each listing and publish.


# How to Cross-list Items to Mercari on Inventory Panel

**Steps:**

1. Navigate to your PrimeLister Inventory Panel Page.&#x20;
2. Select the listing that you want to cross-list to Mercari.&#x20;
3. Click on the "Listing Actions" button which is on the right side of the page.&#x20;
4. Click on the "Cross-list" button from the dropdown menu.&#x20;
5. Click on the ''Mercari'' image button.&#x20;
6. It will open new tabs in your browser and the task will be operated automatically. Please do not close this tab.&#x20;
7. You will need to fill the blank fields if there are any after PrimeLister.&#x20;
8. Review each listing and publish.


# How to Cross-list Items to Facebook Marketplace on Inventory Panel

Steps:

1. Navigate to your PrimeLister Inventory Panel Page.&#x20;
2. Select the listing that you want to cross-list to Facebook Marketplace.&#x20;
3. Click on the "Listing Actions" button which is on the right side of the page.&#x20;
4. Click on the "Cross-list" button from the dropdown menu.&#x20;
5. Click on the ''Facebook'' image button.&#x20;
6. It will open new tabs in your browser and the task will be operated automatically. Please do not close this tab.&#x20;
7. You will need to fill the blank fields if there are any after PrimeLister.&#x20;
8. Review each listing and publish.


# How to Cross-list Items to Etsy on Inventory Panel

**Steps:**

1. Navigate to your PrimeLister Inventory Panel Page.&#x20;
2. Select the listing that you want to cross-list to Etsy.&#x20;
3. Click on the "Listing Actions" button which is on the right side of the page.&#x20;
4. Click on the "Cross-list" button from the dropdown menu.&#x20;
5. Click on the ''Etsy'' image button.&#x20;
6. It will open new tabs in your browser and the task will be operated automatically. Please do not close this tab.&#x20;
7. You will need to fill the blank fields if there are any after PrimeLister.&#x20;
8. Review each listing and publish.


# How to Change Task Interval

You can select one of the available options for task interval time according to your preference. The minimum option of the task interval is 30 sec - 3 min. Primelister does not support lower time intervals. Task intervals are set this way in order to make PrimeLister work exactly the same as a real human does.&#x20;

Task Interval options;&#x20;

* 30 sec - 3 min&#x20;
* 1 min - 5 min&#x20;
* 5 min - 10 min&#x20;

You can update the Task Interval under the Listing Actions tab on PrimeLister Extension.

![](https://2694965679-files.gitbook.io/~/files/v0/b/gitbook-x-prod.appspot.com/o/spaces%2FG6RIJU8HpzCXLZBS9jJ6%2Fuploads%2F4hLfBZaL5u6KR0PWu2wQ%2FMarkup-on-2021-05-20-at-21-36-28.png?alt=media\&token=d7635190-1819-4134-b4fc-07508d755b87)


---

[Next Page](/llms-full.txt/1)